This chapter is part of the TwinCAT 3 Tutorial.
Traditional PLCs offer various forms of data persistence (so your PLC memory isn’t lost when the PLC loses power). Some use battery-backed SRAM, which maintains power to all or a portion of the memory even when power is removed from the PLC. Some use flash-memory technologies. Since TwinCAT 3 runs on PC hardware, and PC memory isn’t battery-backed up, it has a different mechanism for storing persistent variables.
By default, variables in TwinCAT 3 are not persistent. If you restart the runtime, or your PC loses power, then when your PLC program restarts the variables will revert to their default state. This is fine for many situations (we generally want our outputs to start in the off state anyway). However, there are times when we need to store machine state such as part presence or process information and we don’t want to lose it when the PC reboots. TwinCAT 3 allows you to explicitly define variables that are “persistent” for this purpose.
In this chapter I’ll explain how to create persistent variables, how TwinCAT 3 saves and restores them, and how to write a program to periodically save them to a file in case of a crash or power loss.
Declaring Persistent Variables
For this example, I created a new Global Variable List called “PersistentExampleâ€. Note that persistent variables don’t need to be global (they could be defined in a program or a function block, for example). By default a Global Variable List only has one section of declarations (called VAR_GLOBAL):

Anything declared inside of the VAR_GLOBAL section is not persistent. However, we can declare a section to be persistent like this:
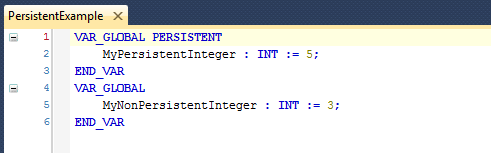
Adding the PERSISTENT keyword after VAR_GLOBAL tells TwinCAT 3 that any variables in this section should be written to persistent storage when the runtime shuts down, and restored from persistent storage when the runtime restarts (the data is actually stored to a file on disk, and I’ll explain more about the details later). I’ve declared two integer variables (one persistent and one non-persistent) as examples, and I’ve initialized them with default values (5 and 3 respectively).
Now let’s login to the PLC, and apply this as an online change. You will now see an online view of this Global Variable List:
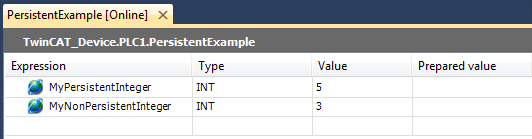
As you can see, both variables have been created in the PLC, and they have the values 5 and 3, respectively. Now I’m going to write new values to them. In the Prepared value column, enter the values 10 and 6, like this:
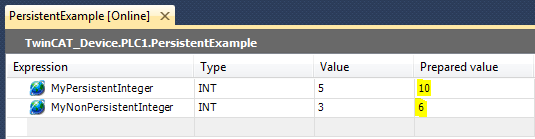
Now choose PLC > Write values to all online applications to overwrite the variable values in the PLC memory:
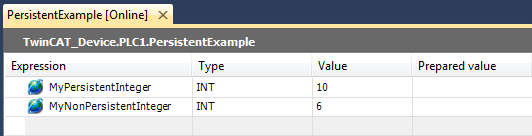
As you can see, the values have changed. Now we’re going to restart the runtime and see what happens. First choose PLC > Logout from the menu and then choose TwinCAT > Restart TwinCAT System to initiate a runtime restart. You will be asked to confirm:
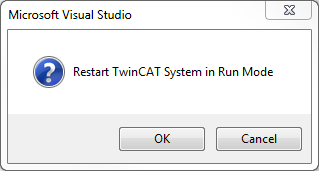
Click OK to restart in Run Mode. You will see the TwinCAT icon in the system tray briefly turn red, and then turn back to green. When that’s done, go back online by choosing PLC > Login from the menu:

You can see that the persistent variable retained the value of 10 that we wrote to it, but the non-persistent variable reverted to the initialization value of 3 that we defined in the variable declaration. The written value of 6 was lost.
How Persistence Works
TwinCAT 3 stores the persistent variables in a file on the computer’s hard drive. The sequence of when this happens is critical to understand to prevent you from losing your valuable persistent data. When you shut down the TwinCAT 3 runtime, here is how it saves your variables:
- The PLC program stops executing
- The runtime reads all of the persistent variables and writes them to a file
- The runtime stops
The persistent data file is stored in the C:\TwinCAT\3.1\Boot\Plc folder, and it will be named Port_851.bootdata. Each PLC instance on a runtime has an “ADS port numberâ€. The default port numbers start at 851. You can change the port number, but that’s not important right now.
When TwinCAT 3 restarts, here is how it restores your variables:
- The runtime loads the PLC program (including the default values of all variables)
- The runtime looks for a persistent data file on the hard drive, and if it finds one, it restores the saved values to the PLC variables
- It deletes the persistent data file from the hard drive
- The PLC program starts executing
If, for some reason, the runtime can’t find the persistent data file, then all of your persistent variables will be reset to their default values. This is actually very easy to demonstrate because if the runtime doesn’t get a chance to shutdown cleanly, it won’t write the persistent data file to the hard drive. Here are some ways that this can happen:
- The PC loses power without doing a Windows shutdown
- The runtime crashes (this shouldn’t happen, but it can happen)
- The persistent data file can become corrupted
The recommended way to install a TwinCAT 3 system is to use a PC with some kind of battery backup, like an Uninterruptible Power Supply (UPS). You must connect the PC to the UPS (via USB cable, etc.) and use the software provided with the UPS to make sure that Windows does a clean shutdown if the UPS loses power for any appreciable length of time. However, this isn’t good enough.
Protecting Your Persistent Data
Even if you use a UPS to provide Windows enough time to do a clean shutdown, there are still many ways that you can lose your persistent data (such as the UPS failing, the hard drive failing, or a runtime crash). Unless you can afford to lose the persistent data, you must do more to protect it.
While your PLC program is running, the only up-to-date copy of your persistent data is the actual values of the variables in your PLC memory. The persistent data file is only written when the runtime shuts down cleanly, and it deletes the persistent data file after reading it when the runtime restarts.
The first step in protecting your persistent data is to periodically write out the persistent data to disk while the program is running. Thankfully TwinCAT 3 provides a function block called WritePersistentData that does exactly this. You can manually instruct the runtime to write out the persistent data file from within the PLC program.
Create a SavePersistentVariables Program
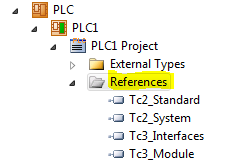
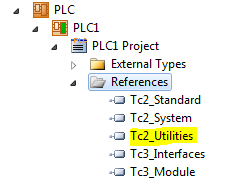
In this section I’ll describe how to write a generic program that handles saving the persistent variables regularly while your program is running. This program will make use of a function block called WritePersistentData that’s provided with TwinCAT 3 in the Tc2_Utilities library. This library wasn’t referenced automatically when you created the PLC program, so you’ll have to add a reference before you can use it. Start by finding the References folder under the PLC1 Project:
There are already 4 libraries referenced. These references were added when you created the project, and they provide some basic function blocks like timers, counters, and string functions. To add a reference to the Tc2_Utilities library, right-click on the References folder and choose Add Library… from the context menu. That will display the Add Library window:
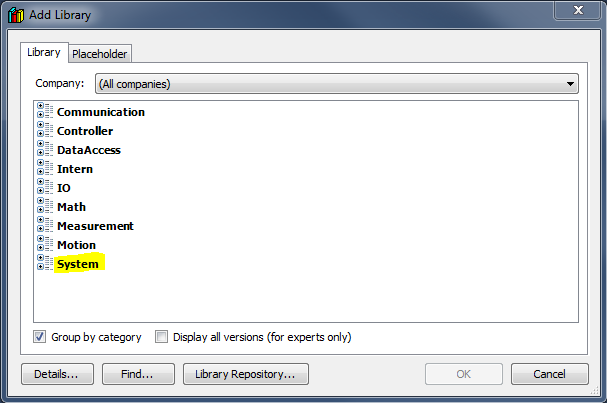
Now click on the System node (highlighted above) to expand it so you can see the system libraries:
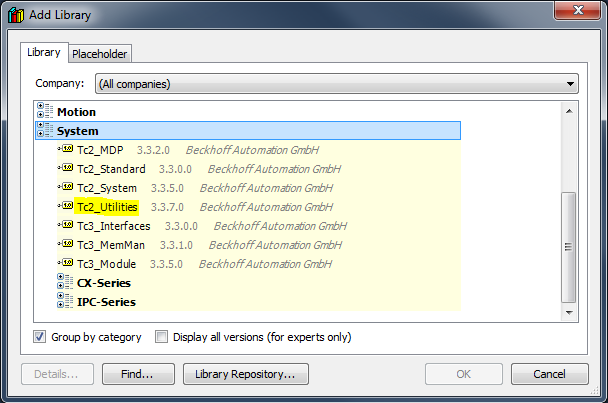
Click on Tc2_Utilities (highlighted above) and then click the OK button. The window will close and you will now see the Tc2_Utilities library added under the References node in the Solution Explorer:
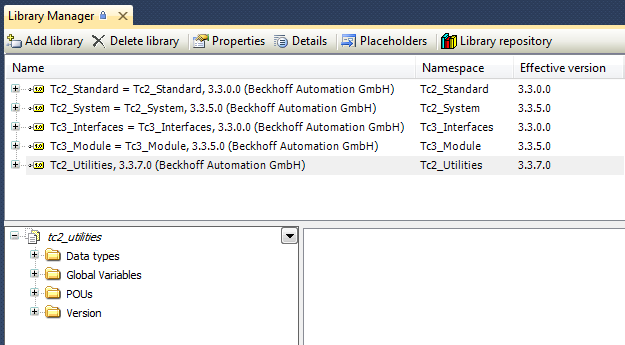
If you want to see a list of what is contained in a library, double-click on that library name in Solution Explorer and it will open the Library Manager window:
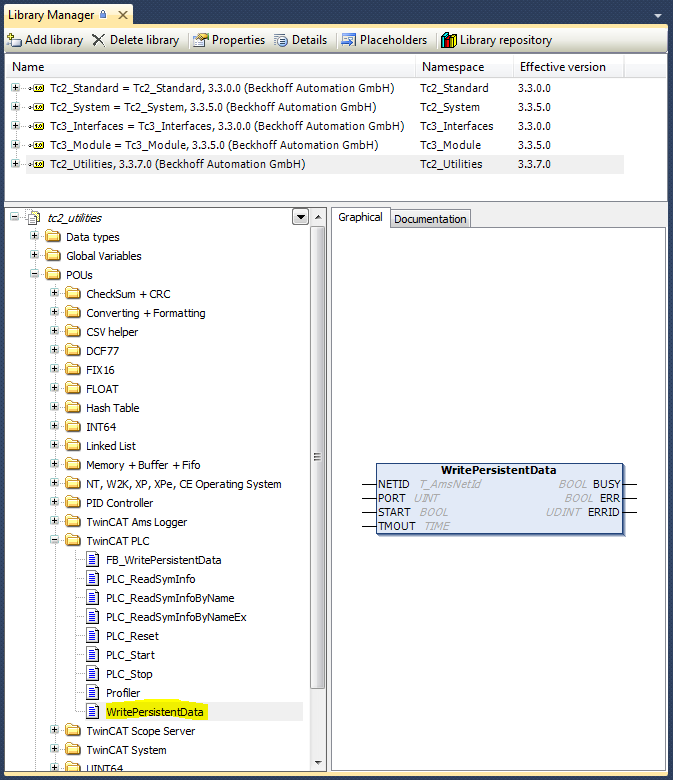
Select a library in the top portion of the window, and you’ll be able to browse the contents of the library in the bottom left corner. With the Tc2_Utilities library selected, expand the POUs folder on the bottom left and expand the TwinCAT PLC folder beneath that to find the WritePersistentData function block. Click on the name of the function block to display a picture of the block on the right side:
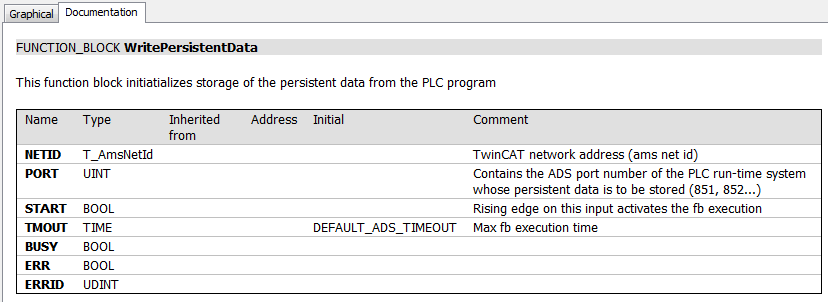
You can click on the Documentation tab above the picture of the block to see more detailed information about the inputs and outputs:
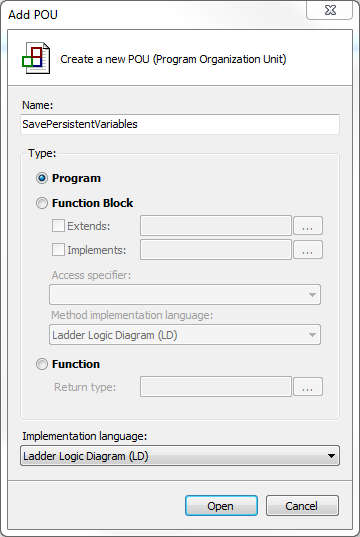
Now we’re going to create a new Program POU called “SavePersistentVariables.” Start by right-clicking on the POUs folder in the Solution Explorer and choosing Add > POU… from the context menu. Enter the program name in the Add POU window and choose Program as the type and Ladder Logic Diagram as the implementation language:
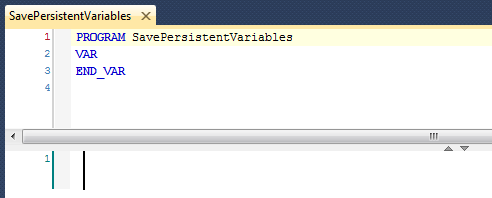
…then click Open to create the program. You will now see the empty SavePeristentVariables program in the ladder logic editor:
Since WritePersistentData (from the library) is a function block, that means it has local state (stored in internal variables) and we have to allocate space for those state variables by declaring an “instance” of the function block as a variable in our program. (Note that the main difference between a Function and a Function Block is that a Function doesn’t have any internal state, so you can use a Function without first declaring an instance of it as a variable). If you’ve ever used a timer or a counter function block in another PLC, you will be familiar with the idea of allocating memory space for each instance of a timer or counter. Declare the function block variable as a local variable of the program, like this:
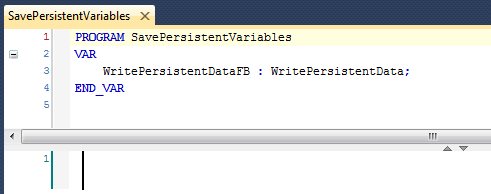
This is just like declaring a BOOL variable. WritePersistentDataFB is the name of the variable, and WritePersistentData is the type. In this case, the type is a data structure that the function block needs to store its internal state.
To add the function block to rung 1, right click on the rung and choose Insert Empty Box… from the context menu. Your rung will now look like this:

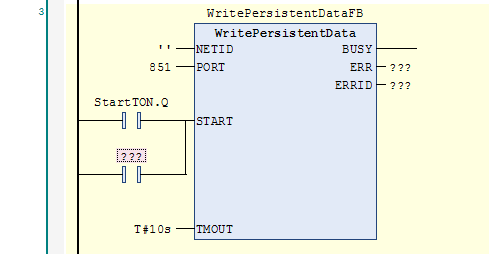
The three question marks inside the box are where you type the function block name, and the three question marks above the box are where you type the variable (or “instance”) name. Go ahead and type WritePersistentData inside the box and WritePersistentDataFB above it:
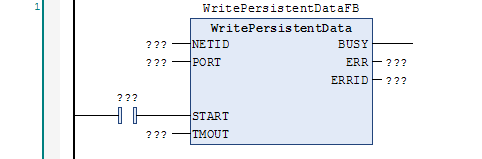
The editor recognizes the function block name and automatically adds the required input and output parameters to the block. We can start by filling in the NETID, PORT, and TMOUT inputs like this:
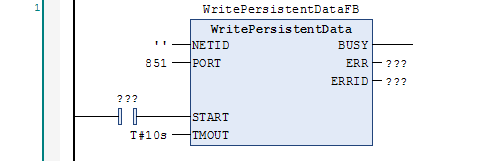
The NETID is an empty string (just two single quotes), which means that the AMS Net ID is the local target (i.e. the PC it’s currently running on). The PORT is 851 because that’s the ADS port number of the PLC1 program.
The TMOUT input is set to 10 seconds, which is a maximum time we will allow for the operation before the function block will abort and set the ERR and ERRID outputs. Notice the format we used for specifying the time. This is a syntax defined in the IEC 61131-3 standard. It allows you to specify durations like this:
T#10ms(10 milliseconds)T#5000ms(5000 milliseconds, or 5 seconds)T#5s(5 seconds)T#1m(1 minute)T#1h30m(1 hour and 30 minutes)T#2d1h(2 days and 1 hour)
The WritePersistentData function block initiates a save of the persistent data when the START input transitions from off to on (also called a “rising edge”). The BUSY output will turn on immediately and will stay on until an acknowledgement has been received (or the timeout expires). When the BUSY output turns off, if there was an error then the ERR output will turn on and the ERRID output will indicate the ADS error number (do a Google search for “ADS Return Codes” to see the list).
Ideally we should save the persistent variables immediately after the PLC program starts, and then at regular intervals after that. We’re going to use two on-delay timers, one to trigger the initial write and a second to trigger the subsequent writes. TwinCAT 3 includes an on-delay function block called TON. It’s included in the standard library, which is already referenced. First you have to create the variables to hold the timer instance data:
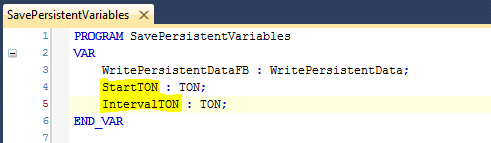
Declare two timers called StartTON and IntervalTON. Now we want to insert a rung to put the first timer on (note that in TwinCAT 3, rungs are called Networks because the ladder diagram editor is also the function block diagram editor, and function block diagram programs are divided into networks). Right-click on the existing rung and choose Insert Network from the context menu. The existing rung will become rung 2, and a new blank rung will be inserted as rung 1:

Now right-click on rung 1 and choose Insert Empty Box from the context menu. Inside the new box, where the three question marks are, type TON and press enter. Then where the three question marks are above the box, type StartTON and press enter. Your rung #1 should look like this:

The IN input of the timer controls when the timer is timing. The PT input is the “preset time” which is how long the timer will run before turning on the Q output. The ET output gives you the current “elapsed time” which is how long it has been since the IN input turned on. We want this timer to start timing right away, so replace the three question marks above the contact that feeds the IN input with the constant value TRUE. We want this timer to fire very shortly after the PLC starts, so enter the time constant T#1ms in place of the three question marks next to the PT input. That will make the timer Q output turn on one scan after the PLC starts (I did this to make sure the WritePersistentData function block will see a transition from off to on). Since we don’t need the ET output, right click on the timer and choose Remove unused FB call parameters from the context menu. That will remove both the Q and ET outputs. Now your timer rung should look like this:

The timer’s output Q will transition from FALSE to TRUE 1 ms after the program starts. Use the output to drive the WritePersistentData function block’s START input (highlighted):

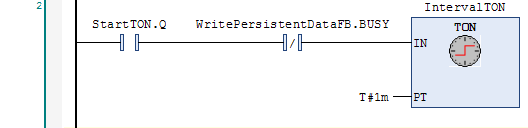
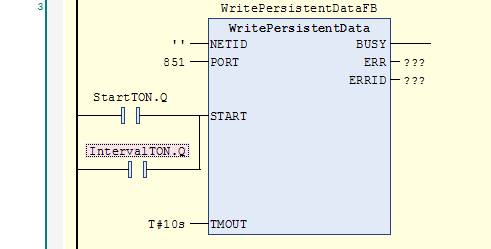
Now we need to create another timer that will fire repeatedly after a certain interval. Insert another rung (between rungs #1 and #2), add another TON function block, this time using IntervalTON as the timer instance. Set the preset time to 1 minute. We want this timer to start after the initial startup timer is complete, and we want it to reset every time the WritePersistentData function block is busy:
Now modify rung #3 (the WritePersistentData rung) so that both timers will trigger the function block’s START input. Begin by selecting the StartTON.Q contact:
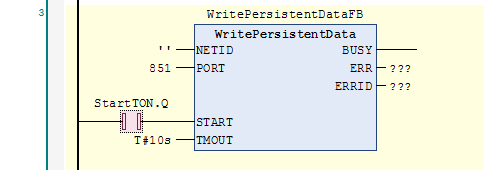
Now right click on the contact and choose Insert Contact Parallel (below) from the context menu:
Then replace the three question marks over the new parallel contact with the output of the second timer (IntervalTON.Q):
Finally, there remains one problem. The StartTON.Q variable will be on almost all the time, but we’re only interested in the rising edge. TwinCAT 3 allows you to change a contact from a normally open contact into a rising edge or falling edge (also called “differentiate up” and “differentiate down”) by selecting the contact and pressing the “P” or “N” keys, respectively. Select the StartTON.Q contact and press the “P” key:
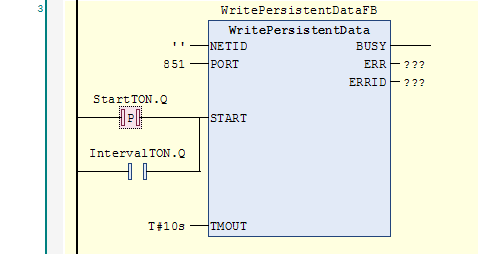
Finally, we don’t want to use the ERR and ERRID outputs. Rather than making them disappear, just delete the three question marks next to those outputs and the compiler will just leave them disconnected for now. Eventually you should consider using the ERR output to create an alarm to notify someone that there’s a problem saving the persistent variables. Here is the complete program:

Here’s how it works:
- The
StartTONtimer fires almost immediately when the PLC starts, and that gives a single pulse to theSTARTinput. - During the initial write process, the
BUSYoutput is on, which preventsIntervalTONfrom running. - When the initial write is complete,
BUSYturns off and thenIntervalTONstarts running. - One minute later the
IntervalTONtimer completes and turns on theQoutput. This triggers theSTARTinput again, which makes theBUSYoutput turn on, which resetsIntervalTONuntil the write is complete. - When the write completes, we go back to step 3.
Before this program will run, you have to call it from your MAIN program. The QuickStart chapter explained how to call other programs from your MAIN program so I won’t repeat that here. Remember to login with an online change to start running this new program.
When you execute this code, you can watch the C:\TwinCAT\3.1\Boot\Plc folder and see the Port_851.bootdata file created, and then see the file timestamp update every minute after that.
Now we have a copy of the persistent data on the hard drive that is at most about 1 minute old. That will protect us if there is a runtime crash or the UPS stops working but it still doesn’t protect us from a corrupt file or a hard drive that stops working. To make sure you can recover from these scenarios, you need to make backups of the persistent data file at regular intervals to another computer.
To restore a backup of your persistent data file:
- Restart your runtime in Config mode
- Replace the .bootdata file with the backed up one
- Restart your runtime in Run mode
Note that in the event of a crash, the restored persistent variables might be up to 1 minute old. That’s still a problem for part presence data, but at least you won’t lose all your setpoints. The persistent data saved when the runtime does a clean shutdown is the primary method for protecting the consistency of your persistent data. That means a good UPS connected to the PC with the USB cable and running the UPS software so it will do a clean shutdown in the event of a power loss is absolutely necessary for every production system using TwinCAT 3.
This chapter is part of the TwinCAT 3 Tutorial. Continue to the next chapter: Structuring PLC Logic.