Category Archives: Software

A Very Fast Tutorial on Open Source Licenses

I’ve written a bit of open source software lately, and I did a lot of learning about open source licenses. Unfortunately, after you learn a lot about a topic, you tend to subconsciously assume everyone knows what you do. In the interest of catching you all up, here’s a cheat sheet with some practical tips:

Note: I use the terms “proprietary” and “commercial” with specific meanings. “Commercial” means an application that isn’t open-source and you sell copies of it for money. “Proprietary” includes “commercial” but also includes software that is only used internally, never sold.

BSD or MIT/X11 Licenses

Sometimes called the “Academic” Licenses

Technically it’s the “revised” BSD license, but it’s been around so long that it’s just the BSD license now. It’s pretty much equivalent to the MIT/X11 license. These are considered to be the least restrictive, “do-anything-you-want” licenses as long as you keep the original notice on the code, display the copyright notice in your program, and don’t infer the author is endorsing your product. Also, it has a disclaimer saying they’re not responsible for anything you do with it. Standard stuff.

You can use this code in proprietary software, and you can use it in a GPL’d work (the common term for this is “GPL-compatible”.)

Apache 2.0

The Apache 2.0 license is similar in use to the BSD license, but it adds a patent grant. That is, it specifically states that if the authors hold any patents that cover the code, you can still use this code and be safe from that. Some might argue that BSD implies the patent grant, but it’s not specific, so Apache 2.0 makes it specific.

You can use it in proprietary software, and it is GPL-compatible, but only with version 3 of the GPL.

Mozilla Public License 1.1 and the Common Development and Distribution License

a.k.a. MPL 1.1 and CDDL

CDDL was based on the MPL 1.1.

These are your “weak copyleft” licenses, copyleft meaning some part of the derived work also has to be released under the same license. What it means is that you can use this code in a proprietary application, but if you make any changes to the code you included, you have to release that code publicly (but not the code of your entire work). The CDDL defines the boundary at the source file, so if you change one of the original files, you have to release that back.

These are not compatible with the GPL.

MS-PL

Microsoft Public License

You’ll see this license a lot if you do much .NET coding. A lot of the stuff you find on MS’s open source site, CodePlex, is MS-PL licensed. The short of it is that you can use it in proprietary applications, but it’s not GPL-compatible (by design – MS hates Linux). It’s also not copyleft at all.

GPL

Your strong copyleft

The GPL is the one everyone loves to hate, but it’s also popular because the Linux kernel is released under the GPLv2 license, and many/most of the tools of the Linux community are GPL-based.

Unlike the previous licenses, if you take any code from a GPL’d program and include it in your own project, you’re making a “derived work” and you must agree to release your entire derived work under the same license (or a later version if the author specifically says you can). That means you can’t use GPL’d code in your commercial application (but you can use it in internal applications).

The reason some programmers are so annoyed by it is that they’re at work Googling for some code to solve their problem, realize someone has written an open source library to do exactly what they want and they get all excited. Then they check the license and their heart drops because it’s GPL and they realize they can’t use it. A small minority go as far as to send hate mail to the author. (As someone who has released some GPL’d code, I’ve received my share of this hate mail, and I find it very silly. I’m offering something for free, under certain conditions, and you are free to take it or leave it.) What most programmers don’t seem to understand is that if you email the author, they’d probably be willing to sell you a commercial license for the code so you could use it in your program.

LGPL

The weak copyleft version

The “L” originally stood for library, but now it stands for “lesser”. It kind of works like the CDDL, but it defines the boundary at the “library” rather than the source file. It basically says you can use this library, even in a commercial application, but if you make any changes to it, you must release your new version of the library under the same (or newer…) license.

It also adds a restriction that some people overlook – you must also provide the users of your application the ability to replace the LGPL’d library with a newer or modified version of that library. Usually this means providing the binaries and compilation instructions. Consider the difficulty of meeting this obligation if your derived work is firmware on an embedded device. Version 3 of the GPL and LGPL make it very clear that you must allow your users all the tools needed to replace the software on the device. This was a reaction to the TiVo, which used GPL’d code, and released the code publicly, but didn’t allow anyone to further modify the code and update their TiVo’s with it.

The other thing you have to worry about is copying code. If you copy any code from the library into your main project, then your project becomes a derived work, and you’re essentially forced to release your whole application under the LGPL. Programmers don’t worry about this too much, but legal departments do.

AGPL

Affero?

It turns out you can take GPL’d code, run it on a server as a web application, make all the changes you want, and never release your code because you’re not “distributing” the derived work, and distribution is what triggers the GPL. (Google has it’s own version of Linux that it never had to release because it only uses it internally).

This ticked off some people who were writing GPL’d blogging and other website type software, so someone came up with the AGPL. This changes the triggering clause, so if you are using the AGPL’d code in a website, you have to make any changes public.

Conclusion

Those are the major licenses you’ll run into. If you’re writing commercial software, you want to look for BSD, MIT/X11, Apache 2.0, MS-PL, MPL 1.1 or CDDL code. You can also use LGPL’d code, but watch out for the extra restrictions.

If the proprietary software you’re writing is only for internal use, or you’re writing it “for hire” for another company that will only use it internally, then you’re safe to use GPL’d or LGPL’d code because you won’t trigger the distribution clause. Just be sure that you make this clear to your management/customer before you go down this path. If they decide they want to sell the software later, they’ll have a mess to clean up.

If you’re writing open source code then you need to pick a license. A BSD license is the easiest, and it’s great for little utility libraries because anyone can use it. If you’re writing an application and you want to protect against some company taking the application, adding a bunch of new features that make it incompatible, and then releasing and charging for it without ever giving you anything, then you should choose the GPL (or AGPL if it’s a web application).

Insteon and X10 Home Automation from .NET

I’ve been playing with my new Smarthome 2413U PowerLinc Modem plus some Smarthome 2456S3 ApplianceLinc modules and two old X10 modules I had sitting around.

Insteon is a vast improvement over the X10 technology for home automation. X10 always had problems with messages getting “lost”, and it was really slow, sometimes taking up to a second for the light to actually turn on. Insteon really seems to live up to its name; the signals seem to get there immediately (to a human, anyway). Insteon also offers “dual-band” technology, meaning the signals are sent both over the electrical wiring of the house, and over a wireless network. On top of this, Insteon implements “mesh networking”, acknowledgements, and retries. The mesh networking means that even if two devices can’t directly communicate, if an intermediate device can see both, it will relay the signal.

Now, where Insteon seems to have improved leaps and bounds on the hardware, the software support is abysmal. That’s not because there’s anything wrong with the API, but because they’ve put the Software Development Kit (SDK) behind a hefty license fee, not to mention a rather evil license agreement. Basically it would preclude you from using any of their examples or source code in an open source project. Plus, they only offer support if you’ve purchased their SDK.

So, I’ve decided to offer free technical support to anyone using a 2413U for non-commercial purposes. If you want help with this thing, by all means, email me, post comments at the end of this post, whatever. I’ll be glad to help you.

Let’s start by linking to all the useful information about Insteon that they haven’t completely wiped off the internet (yet):

Now how did I find all this information? Google. SmartHome (the Insteon people) don’t seem to provide links to any of this information from their home or (non-walled) support pages, but they either let Google crawl them, or other companies or organizations have posted them on their sites (I first found the modem developer’s guide on Aartech’s site, for instance). Once you get one document, they tend to make references to the titles of other documents, so you could start to Google for the other ones by title. Basically, it was a pain, but that’s how it was done.

Now, whether you buy the 2413S (serial) or 2413U (USB), they’re both using the 2412S internally, which is an RS232 device. The 2413U just includes an FTDI USB-to-Serial converter, and you can get the drivers for this for free (you want the VCP driver). It just ends up making the 2413U look like another COM port on your PC (in my case, COM4).

So, assuming you know how to open a serial port from .NET, and you got done reading all that documentation, you’d realize that if you wanted to turn on a light (say you had a switched lamp module at Insteon address “AA.BB.CC”), you’d want to send it this sequence of bytes (where 0x means hex):

  • 0x02 – start of message to PLM
  • 0x62 – send Insteon message over the network
  • 0xAA – high byte of Insteon ID
  • 0xBB – middle byte
  • 0xCC – low byte of Insteon ID
  • 0x0F – Flags (meaning: direct message, max hops)
  • 0x12 – Command byte 1 – means “turn on lighting device”
  • 0xFF – Command byte 2 – intensity level – full on

… after which the 2413U should respond with:

0x02, 0x62, 0xAA, 0xBB, 0xCC, 0x0F, 0x12, 0xFF, 0x06

… which is essentially just echoing back what it received, and adding a 0x06, which means “acknowledge”.

At that point, the 2413U has started transmitting the message over the Insteon network, so now you have to wait for the device itself to reply (if it does… someone might have unplugged it, after all). If you do get a response, it will look like this:

  • 0x02 – start of message from 2413U
  • 0x50 – means received Insteon message
  • 0xAA – high byte of peer Insteon ID
  • 0xBB – middle byte
  • 0xCC – low byte of peer Insteon ID
  • 0x?? – high byte of your 2413U Insteon ID
  • 0x?? – middle byte of your 2413U Insteon ID
  • 0x?? – low byte of your 2413U Insteon ID
  • 0x20 – Flags – means Direct Message Acknowledgement
  • 0x12 – Command 1 echo’d back
  • 0xFF – Command 2 echo’d back

If you get all that back, you have one successful transaction. Your light show now be on! Whew, that’s a lot of overhead though, and that’s just the code to turn on a light! There are dozens of other commands you can send and receive. I didn’t want to be bit-twiddling for hours on end, so I created a little helper library called FluentDwelling so now you can write code like this:

var plm = new Plm("COM4"); // manages the 2413U
DeviceBase device;
if(plm.TryConnectToDevice("AA.BB.CC", out device))
{
    // The library will return an instance of a 
    // SwitchedLightingControl because it connects 
    // to it and asks it what it is
    var light = device as SwitchedLightingControl;
    light.TurnOn();
}

I think that’s a little simpler. FluentDwelling is free to download, open-sourced under the GPLv3, and includes a full unit test suite.

It also supports the older X10 protocol, in case you have some of those lying around:

plm.Network.X10
    .House("A")
    .Unit(2)
    .Command(X10Command.On);

There are quite a few Insteon-compatible devices out there. In addition to lighting controls, there is a Sprinkler Controller, Discrete I/O Modules, a Rain Sensor, and even a Pool and Spa Controller. That’s just getting started!

Upgrading a Legacy VB6 Program to .NET

There is a lot of code out there written in VB6, running just fine. If you’re someone who has to maintain it, then at some point you’ll ask yourself, “should we just bite the bullet and upgrade this to .NET?”

There is, so far, no end-of-life issue on the horizon. VB6 applications will run on Windows 7, and Microsoft has vowed to support the VB6 runtime through the life of Windows 7. That will be a while, so there’s no hurry.

First, you need to do a cost-benefit to determine if it’s worth upgrading. That’s a pretty big task right there. What do you gain by moving to .NET? Certainly you gain a much richer ecosystem of utilities, libraries, persistence layers, test frameworks, etc. You’ll also find it easier to hire developers who have .NET on their resume. It’s pretty hard to find a copy of Visual Studio 6 these days, unless you have an MSDN subscription. .NET features like lambda expressions, LINQ, and reflection are also big productivity boosters if you spend the time to become proficient with them. These are all valid points, but they’re hard to measure.

You’re going to need to do some ballpark estimates. I’ve actually been doing some conversions lately, so I have some real experience to throw at it. Take any VB6 application, and it’ll take you 1/3 to 1/2 of the original development time to rewrite it in .NET with the same feature set (using test-driven development). That’s my estimate… do what you will with it. So, how much maintenance work are you doing, and how much more efficient would you be after the conversion?

So let’s take an application that took one programmer 6 months to write, and then you’ve been maintaining it in 50% of your time for the last year. So there are 12 months of development in the existing application. By my estimate you’ll need to spend 4 to 6 months rewriting. Let’s say you’re twice as fast after the conversion (if you didn’t have unit tests before and you use test-driven development during the conversion, the unit tests alone should make you this much more productive, not to mention the improvements in the IDE and the full object-oriented support). In that case, the payback period is 8 to 12 months of actual planned development. If you have that much work ahead of you, and you can afford to put off working on new features entirely for half that time, you’ll break even.

That’s still a really big investment. The problem is that you won’t have anything to show for it for half that time. It’s surprising how quickly management could lose faith in your endeavor if they a) don’t really understand what you’re doing and b) don’t see any tangible results for months.

There are alternatives to the all-or-nothing rewrite. First, you can use a conversion tool to convert the VB6 to VB.NET. The one that comes with Visual Studio 2005 is notoriously bad, but some of the commercially developed ones are apparently much better. Still, given VB6’s laughably bad support for the object-oriented programming paradigm, the code you get out of the conversion is going to smell more like VB6 than .NET. It will get you done faster, probably more than twice as fast, so it’s still an option. However you won’t get a chance to re-architect the software or normalize the database, etc., in the process.

The other alternative to the “big rewrite” is to do the upgrade in an “agile” manner. Take some time to break the software into smaller modules, each of which can be upgraded in about one month or less. This will significantly lengthen the amount of time it takes you to finish the project, but you’ll have something tangible to show after each month. Most managers can wait this long. This approach has its problems too: you need to write a lot of code to interact between the VB6 and .NET code. It can be tricky.

Normalizing a Database

If you’re in a position where you have a database as a backing store, and you need to make major database structure changes, this must affect your decision. The “big rewrite” is the most friendly to database changes: you just write a single conversion script that upgrades the existing database in-place, and you write your new version against the new schema. You have a clean slate, so you can clean up all the crufty problems in the old schema.

On the other hand, if you’re just using a conversion tool to automatically convert from VB6 to .NET, you can’t change the schema.

If you take the middle road (“agile”), you can change the database structure at the same time, but it’s much more difficult than in the “big rewrite”. As you upgrade each module, it makes sense to modify the database structure underlying that module, but unless you’re really lucky, you’ll have parts of other modules left in VB6-land that are dependent upon database tables that are changing. That means you’ll have the same problem anyone without a really good data access layer (or object-relational persistence layer) has when they go to change the database schema:

You have a whole bunch of code that looks like this: sql = "SELECT MY_COL1, MY_COL2 FROM MY_TABLE JOIN..."

Assuming you don’t have unit test coverage, how do you find all the places in your code that need to be changed when you normalize MY_COL2 out of one table into another? Of course you can start with a search and replace, but if you really have a database normalization problem, then you probably have duplicate column names all over the place. How many tables have a column called CODE or STATUS? There are many pathological cases where a simple text search is going to find too many matches and you’ll spend hours tracking down all the places where the code might change just because of one column being moved or renamed.

The most pathological case is where you have, for instance, two columns like CONTACT1 and CONTACT2 in the same table, and somewhere in the code it says sql = "UPDATE MY_TABLE SET CONTACT" & ContactNumber & " = '" & SomeValue & "'". You’re doing to have a hard time finding that column name, no matter what you do.

You need to develop a smarter system. I’ve tried a couple of different approaches. I tried one system where I auto-generated unique constants for all of my table and column names in my database, and then I wrote a script that went through my source code and literally replaced all of the instances of table or column names inside of strings with the constants. When I changed the database, I regenerated the list of constants, and the compiler was able to catch all the dependencies. Unfortunately, this method has some deficiencies: the resulting SQL statements are more difficult to read, and when you go and make changes to these statements you have to be disciplined enough to use the generated constants for the table and column names, or you break the system. Overall, it saves a lot of time if you have a lot of database changes to make, but costs extra time if you have to write new code.

I tried a different variation of the system where instead of replacing the table and column names in the string directly, I added auxiliary statements nearby that used the constants for the table and column names, and these would generate compile errors if a dependency changed. This made the code easier to read, but had problems of its own.

I don’t have a perfect answer for this problem, but if you have any SQL strings embedded in your legacy VB6 application, and you want to do big changes to your database, I can tell you that you must build a tool for yourself.

Summary

If you really must convert your application from VB6 to .NET then make sure you go into it with your eyes wide open. Engage management in a frank discussion. Make sure you get a strong commitment. If they waffle at all, walk away. The last thing anyone wants is a half-converted piece of software.

Still, I’m here to tell you that it is possible, and if you do your homework, there can be a real payback. Good luck!

Intro to Mercurial (Hg) Version Control for the Automation Professional

There’s a tool in the PC programming world that nobody would live without, but almost nobody in the PLC or Automation World uses: version control systems. Even most PC programmers shun version control at first, until someone demonstrates it for them, and then they’re hooked. Version control is great for team collaboration, but most individual programmers working on a project use it just for themselves. It’s that good. I decided since most of you are in the automation industry, I’d give you a brief introduction to my favourite version control system: Mercurial.

It’s called “Mercurial” and always pronounced that way, but it’s frequently referred to by the acronym “Hg”, referring to the element “Mercury” in the periodic table.

Mercurial has a lot of advantages:

  • It’s free. So are all of the best version control systems actually. Did I mention it’s the favourite tool of PC programmers? Did I mention PC programmers don’t like to pay for stuff? They write their own tools and release them online as open source.
  • It’s distributed. There are currently two “distributed version control systems”, or DVCS, vying for supremacy: Hg and Git. Distributed means you don’t need a connection to the server all the time, so you can work offline. This is great if you work from a laptop with limited connectivity, which is why I think it’s perfect for automation professionals. Both Hg and Git are great. The best comparison I’ve heard is that Hg is like James Bond and Git is like MacGyver. I’ll let you interpret that…
  • It has great tools. By default it runs from the command line, but you never have to do that. I’ll show you TortoiseHg, a popular Windows shell that lets you manage your versioned files inside of a normal Windows Explorer window. Hg also sports integration into popular IDEs.

I’ll assume you’ve downloaded TortoiseHg and installed it. It’s small and also free. In fact, it comes bundled with Mercurial, so you only have to install one program.

Once that’s done, follow me…

First, I created a new Folder on my desktop called My New Repository:

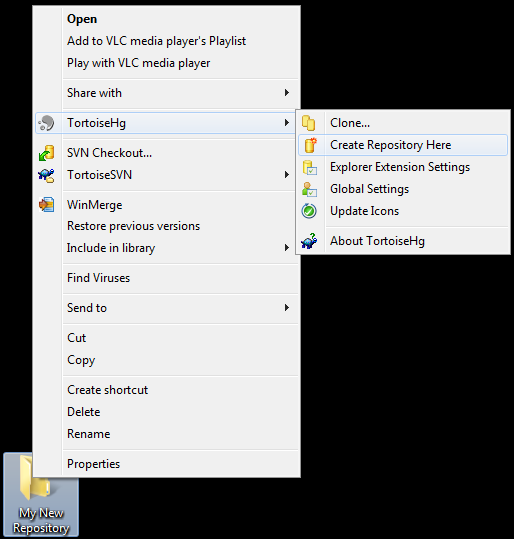
Now, right click on the folder. You’ll notice that TortoiseHg has added a new submenu to your context menu:

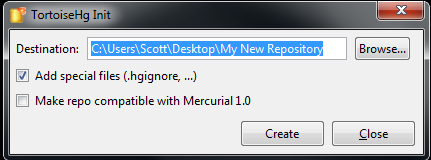
In the new TortoiseHg submenu, click on “Create Repository Here”. What’s a Repository? It’s just Hg nomenclature for a folder on your computer (or on a network drive) that’s version controlled. When you try to create a new repository, it asks you this question:

Just click the Create button. That does two things. It creates a sub-folder in the folder you right-clicked on called “.hg”. It also creates a “.hgignore” file. Ignore the .hgignore file for now. You can use it to specify certain patterns of files that you don’t want to track. You don’t need it to start with.

The .hg folder is where Mercurial stores all of its version history (including the version history of all files in this repository, including all files in all subdirectories). This is a particularly nice feature about Mercurial… if you want to “un-version” a directory, you just delete the .hg folder. If you want to make a copy of a repository, you just copy the entire repository folder, including the .hg subdirectory. That means you’ll get the entire history of all the files. You can zip it up and send it to a friend.

Now here’s the cool part… after you send it to your friend, he can make a change to the files while you make changes to your copy, you can both commit your changes to your local copies, and you can merge the changes together later. (The merge is very smart, and actually does a line-by-line merge in the case of text files, CSV files, etc., which works really well for PC programming. Unfortunately if your files use a proprietary binary format, like Excel or a PLC program, Mercurial can’t merge them, but will at least track versions for you. If the vendor provides a proprietary merge tool, you can configure Mercurial to open that tool to merge the two files.)

Let’s try an example. I want to start designing a new automation cell, so I’ll just sketch out some rough ideas in Notepad:

Line 1
  - Conveyor
    - Zone 1
    - Zone 2
    - Zone 3
  - Robot
    - Interlocks
    - EOAT
    - Vision System
  - Nut Feeder

I save it as a file called “Line 1.txt” in my repository folder. At this point I’ve made changes to the files in my repository (by adding a file) but I haven’t “committed” those changes. A commit is like a light-weight restore point. You can always roll back to any commit point in the entire history of the repository, or roll forward to any commit point. (You can also “back out” a single commit even if it was several changes ago, which is a very cool feature.) It’s a good idea to commit often.

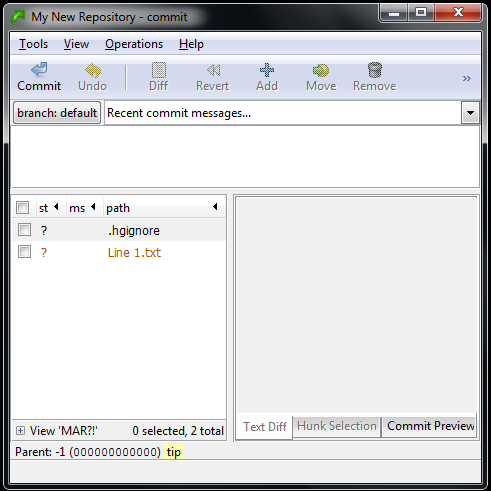
To commit using TortoiseHg, just right click anywhere in your repository window and click the “Hg Commit…” menu item in the context menu. You’ll see a screen like this:

It looks a bit weird, but it’s showing you all the changes you’ve made since your “starting point”. Since this is a brand new repository, your starting point is just an empty directory. Once you complete this commit, you’ll have created a new starting point, and it will track all changes after the commit. However, you can move your starting point back and forth to any commit point by using the Update command (which I’ll show you later).

The two files in the Commit dialog box show up with question marks beside them. That means it knows that it hasn’t seen these files before, but it’s not sure if you want to include them in the repository. In this case you want to include both (notice that the .hgignore file is also a versioned file in the repository… that’s just how it works). Right click on each one and click the Add item from the context menu. You’ll notice that it changes the question mark to an “A”. That means the file is being added to the repository during this commit.

In the box at the top, you have to enter some description of the change you’re making. In this case, I’ll say “Adding initial Line 1 layout”. Now click the Commit button in the upper left corner. That’s it, the file is now committed in the repository. Close the commit window.

Now go back to your repository window in Windows Explorer. You’ll notice that they now have green checkmark icons next to them (if you’re using Vista or Windows 7, sometimes you have to go into or out of the directory, come back in, and press F5 to see it update):

The green checkmark means the file is exactly the same as your starting point. Now let’s try editing it. I’ll open it and add a Zone 4 to the conveyor:

Line 1
  - Conveyor
    - Zone 1
    - Zone 2
    - Zone 3
    - Zone 4
  - Robot
    - Interlocks
    - EOAT
    - Vision System
  - Nut Feeder

The icon in Windows Explorer for my “Line 1.txt” file immediately changed from a green checkmark to a red exclamation point. This means it’s a tracked file and that file no longer matches the starting point:

Notice that it’s actually comparing the contents of the file, because if you go back into the file and remove the line for Zone 4, it will eventually change the icon back to a green checkmark!

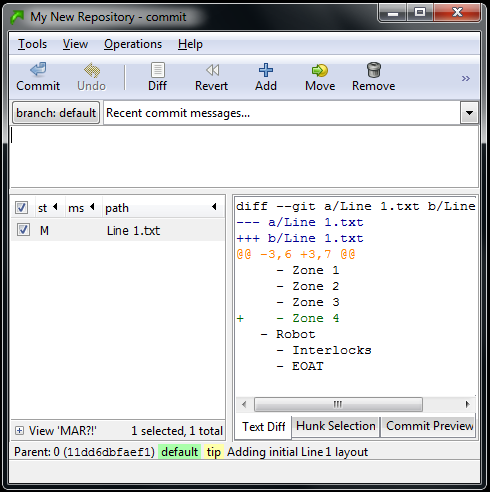
Now that we’ve made a change, let’s commit that. Right click anywhere in the repository window again and click “Hg Commit…”:

Now it’s showing us that “Line 1.txt” has been Modified (see the M beside it) and it even shows us a snapshot of the change. The box in the bottom right corner shows us that we added a line for Zone 4, and even shows us a few lines before and after so we can see where we added it. This is enough information for Mercurial to track this change even if we applied this change in a different order than other subsequent changes. Let’s finish this commit, and then I’ll give you an example. Just enter a description of the change (“Added Zone 4 to Conveyor”) and commit it, then close the commit window.

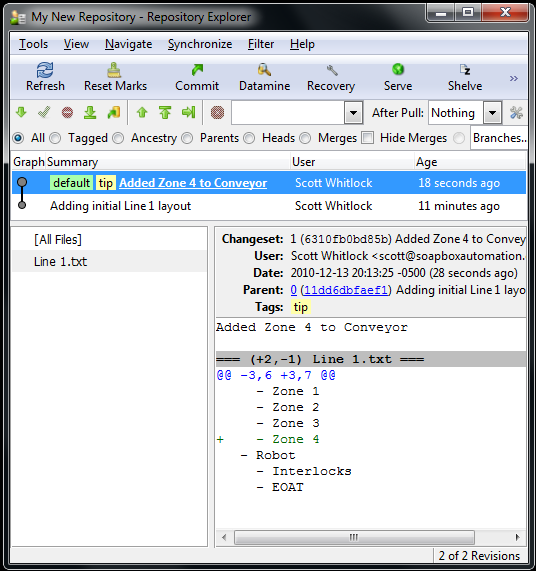
Now right-click in the repository window and click on Hg Repository Explorer in the context menu:

This is showing us the entire history of this repository. I’ve highlighted the last commit, so it’s showing a list of files that were affected by that commit, and since I selected the file on the left, it shows the summary of the changes for that file on the right.

Now for some magic. We can go back to before the last commit. You do this by right-clicking on the bottom revision (that says “Adding initial Line 1 layout”) and selecting “Update…” from the context menu. You’ll get a confirmation popup, so just click the Update button on that. Now the bottom revision line is highlighted in the repository explorer meaning the old version has become your “starting point”. Now go and open the “Line 1.txt” file. You’ll notice that Zone 4 has been removed from the Conveyor (don’t worry if the icons don’t keep up on Vista or Win7, everything is working fine behind the scenes).

Let’s assume that after the first commit, I gave a copy of the repository to someone, (so they have a copy without Zone 4), and they made a change to the same file. Maybe they added some detail to the Nut Feeder section:

Line 1
  - Conveyor
    - Zone 1
    - Zone 2
    - Zone 3
  - Robot
    - Interlocks
    - EOAT
    - Vision System
  - Nut Feeder
    - 120VAC, 6A

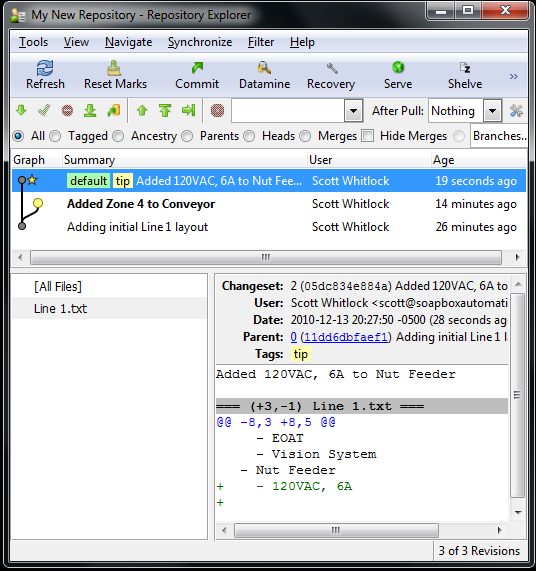
Then they committed their change. Now, how do their changes make it back into your repository? That’s by using a feature called Synchronize. It’s pretty simple if you have a copy of both on your computer, or if each of you have a copy, and you also have a “master” copy of the repository on the server, and you can each see the copy on the server. What happens is they “Push” their changes to the server copy, and then you “Pull” their change over to your copy. (Too much detail for this blog post, so I’ll leave that to you as an easy homework assignment). What you’ll end up with, when you look at the repository explorer, is something like this:

You can clearly see that we have a branch. We both made our changes to the initial commit, so now we’ve forked it. This is OK. We just have to do a merge. In a distributed version control system, merges are normal and fast. (They’re fast because it does all the merge logic locally, which is faster than sending everything to a central server).

You can see that we’re still on the version that’s bolded (“Added Zone 4 to Conveory”). The newer version, on top, is the one with the Nut Feeder change from our friend. In order to merge that change with ours, just right click on their version and click “Merge With…” from the context menu. That will give you a pop-up. It should be telling you, in a long winded fashion, that you’re merging the “other” version into your “local” version. That’s what you always want. Click Merge. It will give you another box with the result of the merge, and in this case it was successful because there were no conflicts. Now click Commit. This actually creates a new version in your repository with both changes, and then updates your local copy to that merged version. Now take a look at the “Line 1.txt” file:

Line 1
  - Conveyor
    - Zone 1
    - Zone 2
    - Zone 3
    - Zone 4
  - Robot
    - Interlocks
    - EOAT
    - Vision System
  - Nut Feeder
    - 120VAC, 6A

It has both changes, cleanly merged into a single file. Cool, right!?

What’s the catch? Well, if the two changes are too close together, it opens a merge tool where it shows you the original version before either change, the file with one change applied, the file with the other change applied, and then a workspace at the bottom where you can choose what you want to do (apply one, the other, both, none, or custom edit it yourself). That can seem tedious, but it happens rarely if the people on your project are working on separate areas most of the time, and the answer of how to merge them is usually pretty obvious. Sometimes you actually have to pick up the phone and ask them what they were doing in that area. Since the alternative is one person overwriting someone else’s changes wholesale, this is clearly better.

Mercurial has a ton of other cool features. You can name your branches different names. For example, I keep a “Release” branch that’s very close to the production code where I can make “emergency” fixes and deploy them quickly, and then I have a “Development” branch where I do major changes that take time to stabilize. I continuously merge the Release branch into the Development branch during development, so that all bug fixes make it into the new major version, but the unstable code in the Development branch doesn’t interfere with the production code until it’s ready. I colour-code these Red and Blue respectively so you can easily see the difference in the repository explorer.

I use the .hgignore file to ignore my active configuration files (like settings.ini, for example). That means I can have my release and development branches in two different folders on my computer, and each one has a different configuration file (for connecting to different databases, or using different file folders for test data). Mercurial doesn’t try to add or merge them.

It even has the ability to do “Push” and “Pull” operations over HTTP, or email. It has a built-in HTTP server so you can turn your computer into an Hg server, and your team can Push or Pull updates to or from your repository.

I hope this is enough to whet your appetite. If you have questions, please email me. Also, you can check out this more in-depth tutorial, though it focuses on the command-line version: hginit.

Will TwinCAT 3 be Accepted by Automation Programmers?

Note that this is an old article and I now have more up-to-date TwinCAT 3 Reviews and now a TwinCAT 3 Tutorial.

In the world of programming there are a lot of PC programmers and comparatively few PLC programmers, but I inhabit a smaller niche. I’m a PLC and a PC programmer. This is a dangerous combination.

If you come from the world of PLC programming, like I did, then you start out writing PC programs that are pretty reliable, but they don’t scale well. I came from an electrical background and I adhered to the Big Design Up Front (BDUF) methodology. The cost of design changes late in the project are so expensive that BDUF is the economical model.

If you come from the world of PC programming, you probably eschew BDUF for the more popular “agile” and/or XP methodologies. If you follow agile principles, your goal is to get minimal working software in front of the customer as soon as possible, and as often as possible, and your keep doing this until you run out of budget. As yet there are no studies that prove Agile is more economical, but it’s generally accepted to be more sane. That’s because of the realization that the customer just doesn’t know what they want until they see what they don’t want.

It would be very difficult to apply agile principles to hardware design, and trying to apply BDUF (and the “waterfall” model) to software design caused the backlash that became Agile.

Being both a PLC and a PC programmer, I sometimes feel caught between these two worlds. People with electrical backgrounds tend to dislike the extra complexity that comes from the layers and layers of abstraction used in PC programming. Diving into a typical “line of business” application today means you’ll need to understand a dizzying array of abstract terminology like “Model”, “View”, “Domain”, “Presenter”, “Controller”, “Factory”, “Decorator”, “Strategy”, “Singleton”, “Repository”, or “Unit Of Work”. People from a PC programming background, however, tend to abhor the redundancy of PLC programs, not to mention the lack of good Separation of Concerns (and for that matter, source control, but I digress).

These two worlds exist separately, but for the same reason: programs are for communicating to other programmers as much as they’re for communicating to machines. The difference is that the reader, in the case of a PLC program, is likely to be someone with only an electrical background. Ladder diagram is the “lingua franca” of the electrical world. Both electricians and electrical engineers can understand it. This includes the guy who happens to be on the night shift at 2 am when your code stops working, and he can understand it well enough to get the machine running again, saving the company thousands of dollars per minute. On the other hand, PC programs are only ever read by other PC programmers.

I’m not really sure how unique my situation is. I’ve had two very different experiences working for two different Control System Integrators. At Patti Engineering, almost every technical employee had an electrical background but were also proficient in PLC, PC, and SQL Server database programming. On the other hand, at JMP Engineering, very few of us could do both, the rest specialized in one side or the other. In fact, I got the feeling that the pure PC programmers believed PLC programming was beneath them, and the people with the electrical backgrounds seemed to think PC programming was boring. As one of the few people who’ve tried both, I can assure you that both of these technical fields are fascinating and challenging. I also believe that innovation happens on the boundaries of well established disciplines, where two fields collide. If I’m right, then both my former employers are well positioned to cash in on the upcoming fusion of data and automation technologies.

TwinCAT 3

I’ve been watching Beckhoff for a while because they’re sitting on an interesting intersection point.

On the one side, they have a huge selection of reasonably priced I/O and drive hardware covering pretty much every fieldbus you’d ever want to connect to. All of their communication technologies are built around EtherCAT, an industrial fieldbus of their own invention that then became an open standard. EtherCAT, for those who haven’t seen it, has two amazing properties: it’s extremely fast, compared with any other fieldbus, and it’s inexpensive, both for the cabling and the chip each device needs to embed for connectivity. It’s faster, better, and cheaper. When that happens, it’s pretty clear the old technologies are going to be obsolete.

On the other side, they’re a PC-based controls company. Their PLC and motion controllers are real-time industrial controllers, but you can run them on commodity PC hardware. As long as PCs continue to become more powerful, Beckhoff’s hardware gets faster, and they get those massive performance boosts for free. Not only that, but they get all the benefits of running their PLC on the same machine as the HMI, or other PC-based services like a local database. As more and more automation cells need industrial PCs anyway, integrators who can deliver a solution that combines the various automation modules on a single industrial PC will be more competitive.

Next year Beckhoff is planning to release TwinCAT 3, a serious upgrade from their existing TwinCAT 2.11. The biggest news (next to support for multiple cores) is that the IDE (integrated development environment) is going to be built around Microsoft’s Visual Studio IDE. That’s a pretty big nod to the PC programmers… yes you can still write in all the IEC-61131-3 languages, like ladder, function block, etc., but you can also write code in C/C++ that gets compiled down and run in the real-time engine.

Though it hasn’t been hyped as much, I’m pretty excited that you can have a single project (technically it’s called a “solution”) that includes both automation programming, and programming in .NET languages like C# or VB.Net. While you can’t write real-time code in the .NET languages, you can communicate between the .NET and real-time parts of your system over the free ADS communication protocol that TwinCAT uses internally. That means your system can now take advantage of tons of functionality in the .NET framework, not to mention the huge amount of 3rd party libraries that can be pulled in. In fact, did you know that Visual Studio has a Code Generation Engine built in? It would be pretty cool to auto-generate automation code, like ladder logic, from templates. You’d get the readability of ladder logic without the tedious copy/paste/search/replace. (Plus, Visual Studio has integrated source control, but I digress…)

Will anyone take advantage?

With such a split between PC and PLC programmers, exactly who is Beckhoff targeting with TwinCAT 3? They’ve always been winners with the OEM market, where the extra learning curve can be offset by lower commodity hardware prices in the long term. I think TwinCAT 3 is going to be a huge win in the OEM market, but I really can’t say where it’s going to land as far as integrators are concerned. Similar to OEMs, I think it’s a good fit for integrators that are product focused because the potential for re-use pays for your ramp-up time quickly.

It’s definitely a good fit for my projects. I’m interested to see how it turns out.

Voting Machines Done Wrong are Dangerous

Talking about voting machines on this blog might seem a little off-topic, but I’m always fascinated by how automation is always interconnected with the people using it. That’s why I think voting machines are fascinating: because people are as much a part of the system as the technology.

I was interested to watch David Bismark’s recent TED talk on “E-voting without fraud”:

The method he’s describing seems to be the same as in this IEEE article.

Now I’m not an expert in the election process, but there are some fundamental things we all understand. One of those fundamental elements is called the “Secret Ballot“. Canada and the US have both had a secret ballot since the late 1800’s. When the concept is introduced in school, we’re shown a picture of how people “used” to cast their votes, which was to stand up in front of everyone at the polling station and call out your choice. Off to the side of the picture, we always saw a gang of people ready to rough up the people who voted for the “wrong” candidate. Therefore, most of us grow up thinking that freedom from retribution is the one and only reason for a secret ballot, so everyone thinks, “as long as nobody can learn who I voted for, then I’m safe.”

That’s really only half the reason for a secret ballot. The other half of the reason is to prevent vote-selling. In order to sell your vote, you have to prove who you voted for. With a secret ballot, you can swear up and down that you voted for Candidate A, but there really is no way for even you to prove who you voted for. That’s a pretty remarkable property of our elections. That’s the reason that lots of places won’t allow you to take a camera or camera-equipped cell phone into the voting booth with you. If the system is working correctly, you shouldn’t be able to prove who you voted for. That means you’re really free to vote for the candidate you really want to win.

I would also like to point out that vote-selling isn’t always straightforward. Spouses (of both genders) sometimes exert extreme pressure over their significant others, and some might insist on seeing proof of who the other voted for. Likewise, while employers could get in hot water, I could easily imagine a situation where proving to your boss that you voted the way he wanted ended up earning you a raise or a promotion over someone who didn’t. All of these pseudo-vote-selling practices always favour the societal group that has a lot of power at the moment, which is why it’s important for our freedoms to limit their influence.

That Means NO Voting Receipts

If you want to design a system that prevents vote-selling, you can’t allow the voter to leave the polling station with any evidence that can be used to prove who they voted for. (The system presented above allows you to leave with a receipt, but they claim it can’t be used to prove who you voted for.)

With this in mind, isn’t it amazing how well our voting system works right now? You mark your ballot in secret, then you fold up the paper, walk out from the booth in plain public view, and you put your single vote into the ballot box with everyone else’s. Once it’s in that box and that box is full of many votes, it’s practically impossible to determine who cast which vote, but if we enforce proper handling of the ballot box, we can all trust that all of the votes were counted.

We Want to Destroy Some Information and Keep Other Information

In order for the system to work correctly, we need to effectively destroy the link between voter and vote, but reliably hang on to the actual vote and make sure it gets counted.

Anyone who has done a lot of work with managing data in computers probably starts to get nervous at that point. In most computer systems, the only way we can really trust our data is to add things like redundancy and audit logs, all of it in separate systems. That means there’s a lot of copying going on, and it’s very easy to share the information that you’re trying to destroy. Once you’ve shared it, what if the other side mishandles it? Trust me, it’s a difficult problem. It’s even more complicated when you realize that even if the voting software was open source, you really can’t prove that a machine hasn’t been tampered with.

The method describe above offers a different approach:

  • With the receipt you get, you can prove that it is included in the “posted votes”
  • You can prove that the list of “tally votes” corresponds to the list of “posted votes” (so yours is in there somewhere)
  • You can’t determine which tally vote corresponds to which posted vote

ATMs and Voting Machines are Two Different Ballgames

One of the things you often hear from voting machine proponents, or just common people who haven’t thought about it much, is that we’ve been using “similar” machines for years that take care of our money (ATMs) and they can obviously be designed securely enough. Certainly if we have security that’s good enough for banks, it ought to be good enough for voting machines, right?

This is a very big fallacy. The only reason you trust an ATM is because every time there’s a bank transaction, it’s always between at least two parties, and each party keeps their own trail of evidence. When you deposit your paycheque into the ATM, you have a pay stub, plus the receipt that the ATM prints out that you can take home with you. On top of that, your employer has a record that they issued you that cheque, and there will be a corresponding record in their bank account statement showing that the money was deducted. If the ATM doesn’t do its job, there are lots of records elsewhere held by third parties that prove that it’s wrong. An ATM is a “black box”, but it has verifiable inputs and outputs.

The system above attempts to make the inputs and outputs of the voting system verifiable.

Another Workable E-voting System

The unfortunate thing about the proposed system, above, is that it’s rather complicated. If you read the PDF I linked to, you need a couple of Ph.D. dissertations under your belt before you can make it through. I don’t like to criticize without offering a workable alternative, so here goes:

Paper Ballots

If you want to make a secret ballot voting system that’s resistant to fraud, you absolutely need to record the information on a physical record. If you want to make it trustworthy, the storage medium needs to be human readable. Paper always has been, and continues to be, a great medium for storing human readable information in a trustworthy and secure way. There are ways to store data securely electronically, but at the moment it requires you to understand a lot of advanced mathematical concepts, so it’s better if we stick with a storage medium that everyone understands and trusts. In this system we will stick with paper ballots. They need to go into a box, in public view, and they need to be handled correctly.

Standardized Human and Machine Readable Ballots

Some standards organization needs to come up with an international standard for paper ballots. This standard needs to include both human and machine readable copies of the data. I suggest using some kind of 2D barcode technology to store the machine readable information in the upper right corner. Importantly: the human readable and machine readable portions should contain precisely the same information.

Please realize I’m not talking about standardized ballots that people then fill out with a pencil. I’m talking about paper ballots that are generated by a voting machine after the voter selects their choice using the machine. The voter gets to see their generated paper ballot and can verify the human readable portion of it before they put it into the ballot box.

Voting Machines vs. Vote Tallying Machines

Now that we have a standardized ballot, the election agencies are free to purchase machines from any vendor, as long as they comply with the standard. There will actually be two types of machines: voting machines that actually let the voter generate a ballot, and vote tallying machines that can process printed ballots quickly by using the machine readable information on each ballot.

One of the goals of e-voting is to be able to produce a preliminary result as soon as voting has completed. Nothing says that the Voting Machines can’t keep a tally of votes, and upload those preliminary results to a central station when the election is complete. However, the “real” votes are the ones on paper in the ballot boxes.

Shortly after the election, the ballot boxes need to be properly transported to a vote tallying facility where they can be counted using the vote tallying machines, to verify the result.

Checks and Balances

Part of the verification process should be to take a random sample of ballot boxes and count them manually, using the human readable information, and compare that with the results from the vote tallying machine. This must be a public process. If a discrepancy is found, you can easily determine if it was the voting machine or the vote tallying machine that was wrong. Assuming the ballots were visually inspected by the voters, then we can assume that the human readable portion is correct. If the machine readable information doesn’t match the human readable information, then the voting machine is fraudulent or tampered with. If the machine and human readable information match, then the vote tallying machine is fraudulent or tampered with.

If one company supplied both the voting machines and the vote tallying machines, then it would be a little bit easier to commit fraud, because if they both disagreed in the same way, it might not be caught. That’s why it’s important that the machines are sourced from different independent vendors.

No Silver Bullet

Notice that none of the current or proposed solutions are successfully resistant to someone taking some kind of recording equipment like a camera or a cell phone with camera into the voting booth with them. We still need some way to deal with this.

Choose MVP over MVVM

When I first saw the Model-View-ViewModel pattern, I thought it was pretty cool. I actually wrote an entire framework and an application using the MVVM pattern. It works, and it gives you a nice separation of concerns between your Model and the rest of your application.

What’s never sat well with me is the amount of redundant and sometimes boilerplate code you have to write in your ViewModel. Assuming you have POCO objects in your domain model and that your domain model shouldn’t know anything about your ViewModel (it shouldn’t), then if you have a domain class called Customer with a Name property, chances are you’ll have a ViewModel class called Customer, with a property called Name, except that the ViewModel will implement INotifyPropertyChanged, etc. It works, but once you get down to coding, it’s a LOT of extra work.

There is an alternative out there called Model-View-Presenter. Most people claim that MVVM is a form of MVP, but once you look closely, that’s not the case (or at least, that’s now how people are using MVVM). In both MVP and MVVM architecture, the ViewModel/Presenter forms a separation between the View and Model. The difference is that in MVVM, the ViewModel works with Model objects explicitly, but in MVP both the View and the Model are abstracted services to the Presenter. Perhaps it’s clearer with an example:

class CustomerViewModel
{
    Customer wrappedCustomerModel;
    public CustomerViewModel(Customer customerToWrap)
    {
        wrappedCustomerModel = customerToWrap;
    }
    
    // Leaving out the INotifyPropertyChanged stuff
    public string Name 
    { get { return wrappedCustomerModel.Name; } }
}

class Presenter
{
    public Presenter(IView view, IModel model)
    {
        populateViewWithModelData(view, model);
        view.UserActionEvent +=
            new UserActionEventHandler((s, e) =>
            {
                model.ProcessAction(e.Action);
                populateViewWithModelData(view, model);
            });
    }
    private void populateViewWithModelData(
        IView view, IModel model)
    {
        // custom mapping logic here
    }
}

There’s at least one major benefit to the Presenter class over the ViewModel class: you can wrap the model.ProcessAction class in a try...catch block and catch all unhandled exceptions from the Model logic in one place, logging them, and notifying the user is a nice friendly way. In the ViewModel case, any property getter can throw an exception, which causes lots of problems in WPF, not the least of which is that it sometimes breaks the binding and no further updates get sent back and forth.

Now let’s look at the constructor of the Presenter again:

    public Presenter(IView view, IModel model)

Nothing says that the View the presenter is hooking into couldn’t be a ViewModel:

    public Presenter(IViewModel viewModel, IModel model)

If you do this, then the Presenter separates the ViewModel from the Model! Ok, does that sound like too much architecture? Why did we want a ViewModel in the first place? We wanted it because we wanted to make the GUI logic testable, and then use WPF’s binding mechanisms to do a really simple mapping of View (screen controls) to ViewModel (regular objects). You still get that advantage. You can create a ViewModel that implements INotifyPropertyChanged and fires off an event when one of its properties changes, but it can just be a dumb ViewModel. It becomes a “Model of the View”, which is what the ViewModel is supposed to be. Since the ViewModel then has no dependencies on the Model, you can easily instantiate mock ViewModel objects in Expression Blend and pump all the test data you want into them.

Doesn’t that mean we’ve shifted the problem from the ViewModel to the Presenter? The Presenter obviously has to know the mapping between the Model and the ViewModel. Does that mean it reads the Customer Name from the Model and writes it into the Customer Name property in the ViewModel? What have we gained?

What if the Presenter was smart? Let’s assume that IModel represents that state of some domain process the user is executing. Maybe it has a Save method, maybe an Abort method. Perhaps it has a property called CustomerAddress of type Address. Maybe it has a read-only property of type DiscountModel, an Enum. Even though we’re working against an abstract IModel interface which probably doesn’t include all of the concrete public properties and methods, we have the power of reflection to inspect the actual Model object.

What if the presenter actually generated a new AddressViewModel and populated it with data from the Model any time it saw a public property of type Address on the concrete Model object? What if it hooked up listener events, or passed in a callback to the AddressViewModel so it could be notified when the user modified the address, and it would write those changes back to the Model, then inspect the Model for changes and update the ViewModel with the results? What if when it saw an Enum property on the Model, it automatically generated a DropDownListViewModel? What if, when it sees a Save method, it generates a SaveViewModel that gets mapped to a button in the View?

Can we write a generic Presenter that can comprehend our Model and ViewModel objects? Can it even build the ViewModel for us, based on what the concrete Model object looks like, and perhaps based on some hints in a builder object that we pass in?

The answer to all these questions are “Yes.” We can use the Presenter to automate the generation of the ViewModel layer based on the look & feel of the domain model itself. I leave this as an exercise for the reader…

When not to use Agile?

I’ve had my head down working on SoapBox Snap recently (an open source, free ladder logic editor and runtime for your PC), so I decided it was a good time to come up for air and write a blog post. A lot has happened with Snap since I posted the sneak peek back in July. I’ve flushed out a good ladder logic instruction set, online debugging is working, and you can now execute the runtime as a Windows service, so it’ll keep running your logic in the background, and even auto-start when Windows starts.

It’s been a long time to get a first version out the door, but it’s always been the plan to adopt an agile workflow after release. That is, short release cycles and continuous small improvements. In fact, that’s what I’m going to talk about… why not to use agile releases during the initial development.

PLANNING: Much work remains to be done before we can announce our total failure to make any progress.

The image above is currently my September calendar picture at work, which made me think of this. Please click on the image to go to Despair Inc. and take a look at their stuff. It’s hilarious.

Writing SoapBox Snap took a lot of planning and design:

I started by tackling online programming. Downloading the entire application every time there’s a change won’t scale as the program grows. That is, how do you design a data structure such that I can modify it locally, generate a packet of data that only contains the difference between this version and that last version, transfer that change over a communication channel, and reconstruct the new version on the other end given the previous version and the difference? I created a library for building this type of data structure, and the communication protocols to make it work, and I packaged it in a library called SoapBox.Protocol.Base. Then I build a data structure for automation programs on top of that and put it in a library called SoapBox.Protocol.Automation. If you follow standard software architecture terminology, I now had my “Model”.

Then I decided to tackle how to make an extensible editor and runtime. I wanted other people to be able to extend SoapBox Snap with new ladder instructions and other features, so extensibility had to be built-in from the ground up. After looking at the various technologies, I settled on .NET’s new Managed Extensibility Framework (MEF), which was only recently released in .NET 4. After playing with it for a while, I realized that part of what I was building was applicable to anyone making an editor-like application with extension points. I decided to encapsulate the “framework” part of it into a re-usable library called SoapBox.Core, and I released it as open source and posted an article on CodeProject about how to use it. Over several months, people have started downloading, using, and even contributing changes back to SoapBox Core to improve it. We’ve setup a Q&A site for people to ask questions, get help, and give feedback.

Armed with a Model, and a Framework, I set off to build SoapBox Snap. At times I made some wrong turns, or started down some dead-ends, but I had a good vision of what I wanted to build. There were nights where I went to bed feeling like I’d banged my head against the keyboard for a few hours and accomplished nothing, but every morning brought a fresh perspective, idea, or insight that helped move the project forward. I didn’t accept any compromises on the core features that affect everything else, like undo/redo. If you don’t get undo/redo right at first, adding it in later means major architectural upheaval.

Ironically, the first problem I solved at a base level, online programming, is only half-implemented in this first version. However, since everything is already there to support full online programming, no major architectural changes have to be made to add it later. My approach was decidedly “bottom-up”. Agile is “top-down”. Would Agile have worked better for this project, or was I right to take a bottom-up approach?

I believe Agile has one failure point: interoperability (and SoapBox Snap is all about interoperability). If you have one closely-knit team doing the development and they’re the only ones that will ever interact with the edges of this application, then I think Agile works well. On the other hand, when you have extensibility points, API’s, or common file formats that 3rd parties are depending on, then doing the kind of massive refactoring that’s required to iteratively change a one-month-old barely-working application into a fully developed one is either going to break the contracts with all 3rd parties, or you’re going to have to support broken legacy interfaces for the rest of your application life cycle. Spending the extra time to build your application bottom-up, and releasing a relatively stable architecture to 3rd parties with working extensions and file formats greatly reduces the friction that Agile development would have caused.

At any rate, we’ve waited long enough. It’s almost over: look for it to be released in early October. I can’t wait to see what people will do with it. 🙂

Getting a Property Name as a String in F#

I’ve been playing around with F# recently, the functional language that shipped with Visual Studio 2010. I’m looking at using it to write an application using WPF and the Model-View-ViewModel architecture. One big requirement is for DataBinding.

When you bind the View to the ViewModel, you typically have to use the explicit name of the property on the ViewModel that you’re binding to (like “Text”). You also need the literal name of the property when you fire off (or receive) the PropertyChanged event. That’s always been a little ugly, because using the literal string means it isn’t compile-time checked. I got around it in C# using a helper class which uses reflection and lambda expressions to look at a piece of code (e.g. o => o.MyProperty) and get the name of the property as a string.

That utility class didn’t work in F#, mostly because F# lambda expressions aren’t the same base object as C# lambda expressions. I was faced with rewriting it. This is where F# seems to shine. Here’s the same “get property name” logic written in F#:

    open Microsoft.FSharp.Quotations.Patterns

    let propertyName quotation =
        match quotation with
        | PropertyGet (_,propertyInfo,_) -> propertyInfo.Name
        | _ -> ""

Here’s how you can use it:

    type myClass(p) =
        member x.MyProperty
            with get() = p

    let myObject = new myClass(1)

    let myPropertyName = propertyName <@ myObject.MyProperty @>

At the end, myPropertyName has been assigned the string value “MyProperty”. It’s a heck of a lot less code. In this case it only works if you have an existing object to run it against. However, you can modify the propertyName function to make it recursively dig through the Lambda and find the PropertyGet:

    let rec propertyName quotation =
        match quotation with
        | PropertyGet (_,propertyInfo,_) -> propertyInfo.Name
        | Lambda (_,expr) -> propertyName expr
        | _ -> ""

    let myPropertyName = propertyName <@ fun (x : myClass) -> x.MyProperty @>

Now you don’t need to have an instance of the class lying around to get the property name.

Let’s do it again for the last time

This week I did something I’ve probably done a hundred times before, but this time it felt absolutely absurd. It’ll probably be the last time I ever do it.

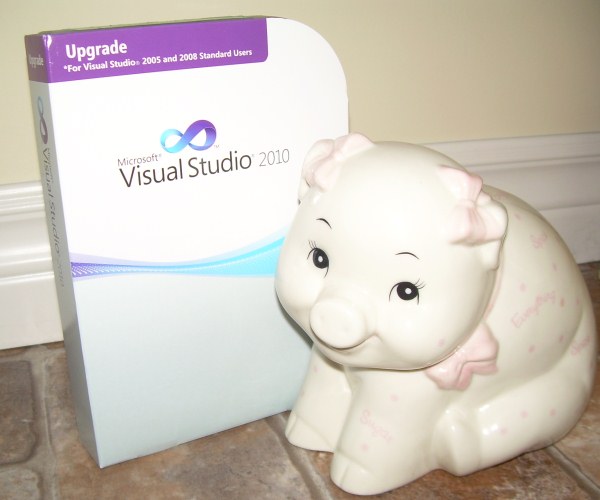
What was this crazy event? I purchased shrink-wrapped software. It was an upgrade copy of Visual Studio 2010 (upgrade from 2008 Standard Edition).
Visual Studio 2010 Upgrade

I had to add a cute little piggybank because otherwise it just looked pathetic.

This little box of bits says it was “made in Puerto Rico”. I guess that means the RTM build was FTP’d to some server in Puerto Rico where it was burned onto a dual layer DVD. In fact it’s likely the DVD’s were burned somewhere else and shipped to Puerto Rico, but anyway, this DVD was then stuffed into plastic case along with a 5×7 piece of heavy stock paper with a beat up yellow sticker on it: the license key.

This plastic case was then stuffed into a cardboard sleeve and shrink-wrapped. It probably made its way to a distribution center before being sold to an online distributor CDW, where it sat on a shelf for a few weeks.

It was at this time that I started hunting around for a Visual Studio 2010 license. I had a copy of VS 2008 and I knew there was a discount for upgrades. You can actually download fully licensed copies from the Microsoft store for $399 (CDN), but I found this boxed copy for about $30 cheaper. Of course I still had to pay S&H, but that was about $13 (UPS Ground).

That was on Friday. Today it’s Monday and I received a call from the local UPS distributor. They’d put it on the wrong delivery truck today, so they wouldn’t be able to deliver it until tomorrow. I wasn’t going to be home anyway, so I told them I’d pick it up tonight after work.

I drove a good 25 km out of my way to go pick it up. The truck wasn’t back from its run yet when I got there, so I stood in line another 20 minutes waiting. I’m not knocking UPS here: their whole system boggles my mind. They knew exactly where this package was 100% of the time, even when it ended up being loaded on the wrong truck, and it was in my hand about 20 seconds after the truck pulled up to the building.

Never underestimate the bandwidth of a UPS truck full of dual layer DVDs.

After installing the software, the first thing it asks you to do is check for updates online. That’s because the version that came on the disk was probably out-of-date before it made it out of Puerto Rico. The only thing I really bought was a yellow sticker with my 16 digit license key on it. I could have downloaded a fully working copy last Friday night, and had it in about 2 hours. It would have worked for 60 days, and you could extend it for another 60 for no cost at all. The only thing of value was the legal right to use this software past the evaluation date. The 16 digit license key is only a proof of purchase.

The absurdity of shipping useless plastic and paper all of the continent, driving out of my way and even standing in line to pick it up, just to “prove” that I paid for a legal license to use the software — it’s really striking isn’t it? What’s crazier is how normal this seemed ten or even five years ago!

It’s not like I wouldn’t have purchased the $399 copy from Microsoft if that’s the only one I could find. I went through this because, well, given the chance to save about $15, I’m just cheap. I guess they figure some people won’t bother to pay money for something they can’t hold in their hand, but aren’t we past that now? Apple figured it out. Look at the iPhone App Store, and iTunes.

If I relate this story to my daughter ten years from now, she’ll think I’m nuts. You bought software how? Why?!?

Well, good riddance, shrink-wrapped software. Rest in peace.