This is part of an RSLogix 5000 Tutorial.
So I just finished explaining how to layout your high level program structure. Now let’s look at how to layout your routines.
When we created our programs, we had the advantage that within the continuous task, we could order our programs any way we liked, and the processor will actually execute them in that order, and the software will display them in that order in the controller organizer. Anyone reading your program expects the logic to be scanned in the order that they see it in the controller organizer, so this is great. However, when we get into laying out the routines, you have to be more careful.
Each program has one “Main Routine” (you can tell because it has a “1” overlaid on the icon of the routine). When the program starts, it only executes that one routine, and you have to jump to any other routines that you want to call. Of course you can create a really elaborate program that jumps to one routine, and it jumps to another, etc., but the readability really suffers. In almost every case, it’s better to make sure that the logic scans in the same order that your routines are laid out inside the program. (If you want to make re-usable logic, I highly suggest looking into writing your own function blocks).
You can name the routines in your program anything you want, as long as it starts with a letter and contains no spaces. In the controller organizer, they will be listed alphabetically. Therefore, if you want to make them list in the same order that they scan, you need to come up with a naming convention. Since you have to start the name with a letter, that limits your options (you can’t just use 001, 002, 003…). In most cases, the first letter of the routine will group the routines into the general type of routine, and the letters or numbers following that will order the routines within that group. It’s typical to add some kind of description to the name after that as well. This is best illustrated with an example:
- Aa_Main
- Ab_Modes
- Ca_Arm_UpDown
- Cb_Arm_ClampUnclamp
- Cc_Slide
- Cd_Bowl_Feeder
- Ma_Axis1
- Mb_Axis2
- Pa_Part_Tracking
- Sa_Sequence
- Za_HMI
So in this case, I’ve grouped my routines into A for housekeeping, C for discrete output control, M for motion axes, P for part tracking, S for sequence logic, and Z for HMI logic. Within each group I’m using a, b, c… to give some kind of ordering to the routines. Your Aa_Main routine has to be selected as the main routine for this program, and it must call each of the rest of the subroutines in the same order as they are listed above (unconditionally). Anything else just confuses the next person who has to decipher your program.
Going back to our WashingMachine program for a second:
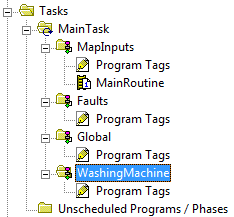
Currently it has no routines at all. Right click on the WashingMachine program and select New Routine…:

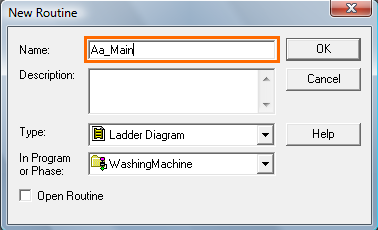
That will display the New Routine dialog box. Enter the routine name “Aa_Main” (highlighted) and click OK:
You will now see the new Aa_Main routine in the program:

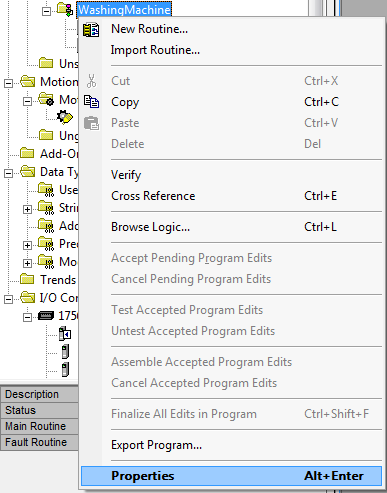
However, the new routine isn’t actually set as the Main Routine of the program. To do that, right click on the WashingMachine program and select Properties:
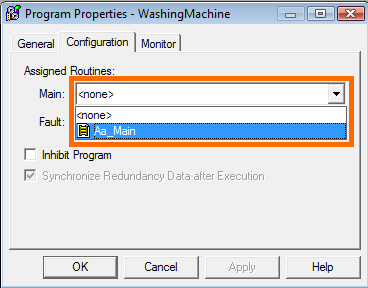
That opens the program properties dialog for the WashingMachine program. Click on the Configuration tab, and choose Aa_Main from the “Main:” drop down box (highlighted):
Click OK and you’ll now see that the Aa_Main program has a small “1” displayed on the routine icon (highlighted):

I’ve gone ahead an entered some more routines into the WashingMachine program (I’ve left out the Auto Sequence routines for now):
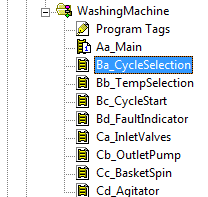
Now you have to add logic to call each routines from the Main Routine. Double click on the Aa_Main to open it. You’ll see an empty routine:

Those small letter “e”s in the left column means there’s an error in that rung. It doesn’t like that the rung is empty. Let’s start by adding a JSR (jump to subroutine) instruction. The easiest way to do this, if you have the rung highlighted, is to type the letters J – S – R and then press enter:

As you can see, there’s still an error. We haven’t filled in what routine we’re jumping to (see the question mark next to Routine Name in the JSR instruction). Double click on the question mark and it will turn into a drop down list where you can select from the routines you’ve already defined in this program:

Select the first routine after Aa_Main (in this case Ba_CycleSelection):

Now repeat the process for the rest of the routines in your program. You should end up with something like this:
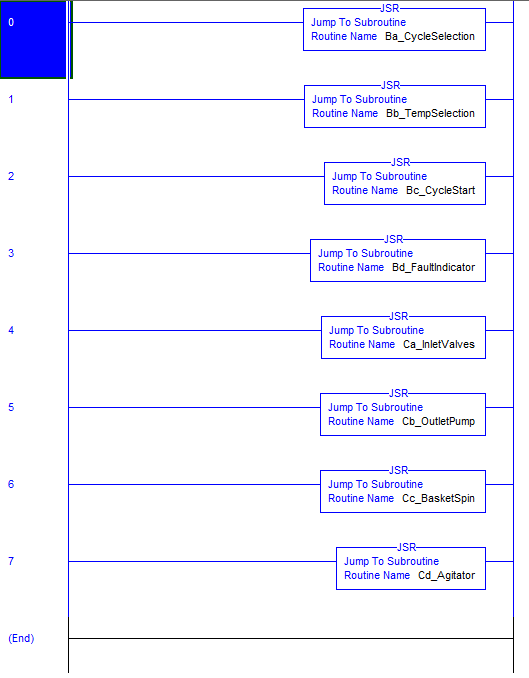
That’s the basics of laying out your routines. In the next section I’ll get into mapping your inputs.
Hi,
Good tutorial! Really helps a newbie like me to program properly. Keep up the good work 🙂
If you would like to use numbers to name your routine, it does allow you to do so if you start with an underscore i.e. “_010_Main”
Thanks for lending a hand to newbies. Keep up the good work!
I like how you presented the information.
I teach PLC / DCS / Industrial networks, and you can always see a good instructor. That person lays the material out like a book. Beginning, middle, and an end.
Good presentation. 🙂
Awesome presentation. Thank you very much for this information.
Very good work, thank you very much for the support to those who just started.
Thank you
Greetings from Mexico