This chapter is part of the TwinCAT 3 Tutorial.
TwinCAT 3 gives you a lot of options about how to organize the data (whether boolean, integer, floating point, string, or user defined data) in your PLC project. As with any PLC project, you want your data structures to follow naturally from the actual machine it’s controlling. I think we can all agree that Infeed.Conveyor.Running is easier to understand than bit[328].
Global vs. Local Variables
If you’re coming from the RSLogix 5000 world then you’re probably already familiar with the concept of global vs. local variables. A ControlLogix has “controller scope” and “program scope” tags. Essentially “controller scope” tags are global (because every program can see them) and “program scope” is local because only the program they’re defined in can see them. It’s also pretty common to come across PLC projects where all the tags are declared in “controller scope”.
TwinCAT 3 also has global variables and local variables. Global variables live in “Global Variable Lists” and Local variables live inside programs, function blocks and functions (a.k.a “POUs”). As for what should go where, that’s ultimately your decision, but here are the rough guidelines I use:
- Inputs and Outputs: Global
- HMI Buttons and Indicators: Global
- HMI Alarms: Global
- Faults: Global
- Interlocks: Global
- Everything Else: Local
What do I mean by “Interlocks”? When you divide up your program, you typically divide it into modules that physically match your machine, so you might have a program for the Infeed Conveyor, one for the a Pick & Place, and one for a Robot. Most of your Infeed Conveyor logic shouldn’t care about the Pick & Place logic, except that you might want to prevent the Infeed Conveyor from running if the Pick & Place isn’t out of the way of the conveyor. In that case, you probably want to create a global PickAndPlace.ClearOfInfeedConveyor variable. The Pick & Place logic is responsible for setting this using a coil, and the Infeed Conveyor logic uses it to prevent running the conveyor. This is an “interlock” signal and since two different programs need to access it, then it’s a good candidate for a global variable.
You’ll also notice that everything accessible from an HMI is also global. This is just my preference. You don’t have to do that… an HMI can access local variables, but since an HMI-accessed variable is kind of like an interlock, I like to give them Global status. When someone is reading or modifying your PLC logic they’ll tend to make the assumption that Local variables are only accessed, well… locally. That means when they want to make a change, they’ll only check for usages of the variable within that local scope. Checking the HMI for references to that variable is much harder. That’s why I suggest making HMI-accessed variables Global and also indicating with a comment that they are accessed from the HMI.
Global Variable Lists
When you created your PLC project in TwinCAT 3, the wizard automatically creates a GVLs folder:
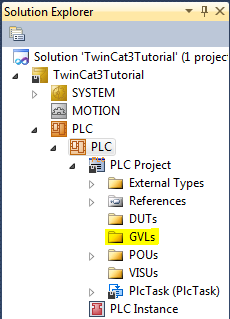
“GVL” stands for “Global Variable List.” It’s Beckhoff’s intention that you should put all your global variable lists in the GVLs folder, but I think that’s incorrect. The organization and structure of your PLC project should mimic the physical and logical organization of your machine. Let’s continue our example of a machine with an infeed conveyor followed by a pick & place. If those are two major components of the machine, then that’s a logical way to break down our logic and data.
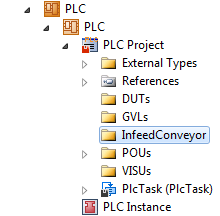
Let’s create two folders under our project called InfeedConveyor and PickAndPlace respectively. Start by right clicking on the PLC Project node and selecting Add -> New Folder from the context menu. That will create a new folder called NewFolder1 and you can change the name to InfeedConveyor:
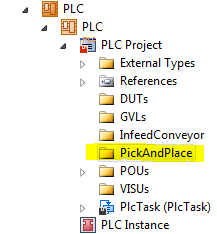
You can do the same to add a PickAndPlace folder:
I want to stop here and talk about folder ordering. First of all, TwinCAT 3 will order the folders and items in a folder alphabetically. Secondly, TwinCAT 3 has a bug where it will only re-order them after you save your project, close the solution and open it again. Initially they show up based on the original folder name, which was NewFolder1 (hopefully this is fixed in a later version). Since the folders represent the major components of our machine, we want the ordering to flow logically from the way the machine works. If the machine works by parts being introduced to the machine on the infeed conveyor, and are then processed by the pick & place, then it makes the most sense to have the InfeedConveyor folder come before PickAndPlace folder. It just so happens that “I” comes before “P” in the alphabet, but this is only a happy coincidence. That’s why I suggest prefixing each folder with a number so you can enforce a logical ordering:
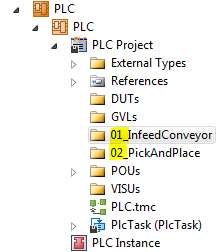
I used two digit numbers because that will allow it to sort correctly from 01 through 99. Don’t worry about needing to insert one later as renumbering even 10 or 20 folders doesn’t take very long.
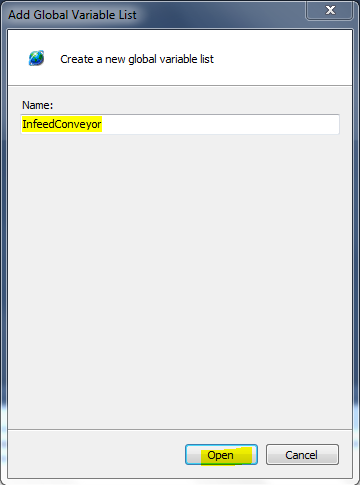
Now let’s add a Global Variable List for the infeed conveyor. Right click on the 01_InfeedConveyor folder and select Add -> Global Variable List… from the context menu. That will display the Add Global Variable List dialog. Enter InfeedConveyor in the Name text box and click the Open button:
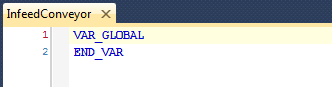
Now you’ll see an empty global variable list in the editor:
Now we have to imagine some global variables that our imaginary conveyor might have. I think it needs an output to turn on the motor (we’ll call that “Run”), a through-beam sensor across the end of the conveyor to sense when a part reaches the pick position (we’ll call that the “NoPart” input) and maybe this conveyor needs to signal to the pick & place that the conveyor is stopped (we’ll call that the “Stopped” interlock). Here’s what a global variable list with those 3 variables would look like:
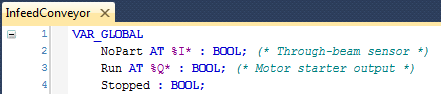
Let’s look at the first variable:
NoPart AT %I* : BOOL; (* Through-beam sensor *)
The line starts with the variable name (NoPart). Typical variable naming rules apply, so you can’t start the name with a number, and you can’t have spaces or special characters in the name, except an underscore. Here I’ve used the PascalCase way of writing the variable, by sticking capitalized words together. You don’t have to use PascalCase, but you should pick a consistent way of naming your variables and stick with it.
After the variable name is an optional element that defines the variable as an input or output (AT %I*). The “I” means input and a “Q” means output. Adding this element will force the variable to show up in the PLC project’s I/O map which makes it available for linking to physical I/O. Inputs are set by the input scan before your logic runs, and outputs are set by your logic, but copied to the physical outputs during the next output scan. (Technically the input an output scans happen at the same time.)
A colon (:) separates the declaration of the variable from the variable type (BOOL). Here are the common types you’ll use, though there are more:
BOOL: A boolean value (TRUEorFALSE)BYTE: An 8-bit unsigned integer value (0 to 255) akaUSINTSINT: An 8-bit signed integer value (-128 to 127)WORD: A 16-bit unsigned integer value (0 to 65,535) akaUINTINT: A 16-bit signed integer value (−32,768 to 32,767)DWORD: A 32-bit unsigned integer value (0 to 4,294,967,295) akaUDINTDINT: A 32-bit signed integer value (−2,147,483,648 to 2,147,483,647)ULINT: A 64-bit unsigned integer value (0 to 18,446,744,073,709,551,615), new in TwinCAT 3LINT: A 64-bit signed integer value (-9,223,372,036,854,775,808 to 9,223,372,036,854,775,807), new in TwinCAT 3REAL: A 32-bit floating point valueLREAL: A 64-bit floating point valueSTRING: An ASCII null-terminated string, default 80 charactersSTRING(n): An ASCII null-terminated string, with max length “n” charactersTIME: A 32-bit time value (typically used in timers)
A note on how much memory each one takes: for anything that says “8-bit”, “16-bit”, “32-bit” or “64-bit” then the memory usage is 1 byte, 2 bytes, 4 bytes, or 8 bytes respectively. A BOOL could be represented by a single bit, but takes a full byte (this is for performance reasons). There is also a rarely used data type called BIT which uses a single bit, and can have the values 0 and 1, but this is not equivalent to a BOOL. A STRING takes 81 bytes (80 for the characters and 1 for the null terminator) and a STRING(n) takes n+1 bytes.
Beckhoff’s Infosys site has more information about TwinCAT 3 Data Types.
After the data type, there is a terminating semi-colon (;). The compiler stops reading here.
After the semi-colon you can put an optional comment ((* Through-beam sensor *)). There are two ways to insert comments: you can enclose them in bracket-asterisks, as I did, or you can preface them with a double-slash (//). Note that comments will show up as tool-tips when you hover your mouse over any use of this variable in your logic, so they are helpful.
The other thing that shows up in a tool-tip over a variable is the data type (BOOL, INT, etc.). Long before we had helpful features like this in our IDE, programmers invented a system for embedding the type of the variable in the variable name called Hungarian Notation. You will often see TwinCAT code examples, even in the official documentation, that use Hungarian Notation (such as bIsTRUE : BOOL;). This is now discouraged thanks to smarter and more helpful editors. In general you should avoid Hungarian Notation in your TwinCAT 3 programs.
When you refer to global variables in your logic, you should use the fully qualified name of the variable (including the Global Variable List name) such as InfeedConveyor.Run. Technically it will let you omit the Global Variable List name and just use the variable name (Run). This is a throw-back to TwinCAT 2 where there was only one Global Variable List. You don’t want to run into a situation where it gets confused with another global variable called Run in another Global Variable List (OutfeedConveyor.Run would be an obvious one). If you happen to do this, the compiler will give you an error telling you that you have an ambiguous variable name and it will force you to use the fully qualified name. I suggest using fully qualified names for all global variables.
Adding Structure(s)
A conveyor is a pretty simple piece of equipment and I doubt you’d want to break up the structure of the InfeedConveyor Global Variable List into smaller pieces, but for a larger part of the machine you might want to. For instance, the pick & place might have two positions (Pick and Place). Rather than having variables such as PickAndPlace.InPickPosition it’s a bit nicer to have PickAndPlace.Pick.InPosition (I realize some of the reasons why it’s nicer might not be obvious at this point, but trust me).
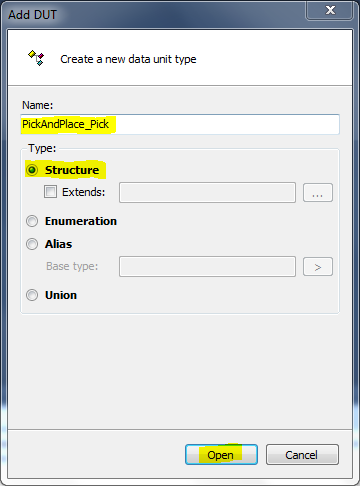
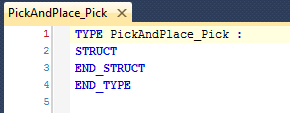
You can accomplish this with TwinCAT 3’s Structure, which is a kind of Data Unit Type, a.k.a. “DUT”. In the RSLogix 5000 world, this is called a “UDT” meaning “user defined type.” Let’s start by creating a Structure for the pick & place’s Pick position. Begin by right clicking on the 02_PickAndPlace folder and selecting Add -> DUT…, which will open the Add DUT dialog window. Enter PickAndPlace_Pick in the Name text box. Make sure the Structure radio button is selected in the Type group box. Then click the Open button:
That will generate a new (empty) structure in the editor window:
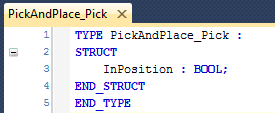
Any variables we add here will show up prefixed with PickAndPlace.Pick. in their fully qualified name. Add an InPosition variable like this:
Now let’s create a new PickAndPlace Global Variable List. Right click on the 02_PickAndPlace folder, use Add -> Global Variable List… and after creating it, add this variable:
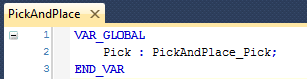
Now we’ve created a variable called PickAndPlace.Pick.InPosition. Note that you can also define inputs and outputs inside your structure (by adding AT %I* or AT %Q* respectively).
Arrays
It’s often advantageous to declare a numbered list of variables, and for this we traditionally use arrays. TwinCAT 3 has full support of arrays of any type. The syntax for declaring an array variable looks like this:
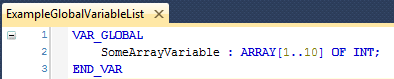
To use this array in your logic, it would look like this: ExampleGlobalVariableList.SomeArrayVariable[1]. That would be the first element. The last element in the array would be ExampleGlobalVariableList.SomeArrayVariable[10].
Note that the syntax ARRAY[lower..upper] OF allows you to define any lower or upper bounds you like. Unlike a language like C, your lower bound doesn’t have to be zero. The total number of elements in the array is upper - lower + 1.
You can also define multi-dimensional arrays like this:

You could access the first element of the array like this: ExampleGlobalVariableList.SomeArrayVariable[1,50] and the last element as ExampleGlobalVariableList.SomeArrayVariable[10,55].
Caution: when some programmers graduated from RLogix 500 to RSLogix 5000 and were first introduced to tags, they just didn’t “get” it. They wanted their nice safe B3:0/5 or whatever. Since the concept of tags was confusing, they just created a big controller-scope array tag called bits and used bits[0], bits[1], bits[2], etc. in their logic. It was a bad idea, but doing the same thing in TwinCAT 3 is a really bad idea. At least in RSLogix 5000 you could add a useful comment for each element of the array but there is no method of doing that in TwinCAT 3 (because you’re not supposed to do that anyway). Your TwinCAT 3 program would be completely incomprehensible.
I would also like to caution you against using arrays for things that aren’t naturally numbered, or which aren’t a good fit for fixed numbers. For instance let’s say you have an auto sequence of steps like:
- Run conveyor to sensor
- Pick part from conveyor
- Place part on fixture
- Return pick & place to home
Perhaps you would like to implement that auto sequence using the Step pattern. Good idea. Now you might think you want to create an array of variables for your steps, such as PickAndPlace.AutoSequence.Step[1]. Having done this in the past, I now think it’s a bad idea. It’s very common to have to modify your auto sequence to add or remove steps in the future. What if between your pick and place step you wanted to add a measurement step? It’s not so easy to add a step 2.5 when you’ve declared them as an array, and renumbering the steps in all your logic can be a real pain. I think it’s better to create variables like PickAndPlace.AutoSequence.PickStep and PickAndPlace.AutoSequence.PlaceStep. Then you can add and remove steps, or even re-order them, without cursing yourself later.
Conciseness and Readability
You might notice that some of my variable names above end up very long. I agree that’s a problem. On the one hand, since the comments for each variable only show up if you hover your mouse over the variable, you shouldn’t make your variable names too cryptic or it will be hard for someone to understand your logic. On the other hand, if you make them too long, you can’t fit enough of your ladder logic on the screen at once, and the logic itself becomes difficult to follow. There’s a trade-off to make in conciseness vs. readability.
I suggest making short codes or acronyms for your top level machine elements. For example, you could abbreviate InfeedConveyor as IFC and PickAndPlace to PP. When someone looks at your PLC project, they will still see 01_InfeedConveyor and 02_PickAndPlace as two folders, and inside each there will be Global Variable Lists IFC and PP respectively. Since you’re only doing this at the top level of your program, and it’s fairly easy for someone to see the relationship of the full name to the abbreviation, I think this is a good way to shorten your fully qualified variable names without sacrificing much readability.
For the lower level variable names, make an effort to pick names that are still concise but convey the meaning to the reader. Yes, it takes practice and there’s no perfect answer, but effort really counts here.
This chapter is part of the TwinCAT 3 Tutorial. Continue to the next chapter: Persistent Variables.